You can get the Apache software from the course CD-ROM
in directory \software\apache1.3.29\, filename
apache_1.3.29-win32-x86-no_src.exe,
or you can get it online as follows:
Go to the main apache web site
http://www.apache.org
and download the windows binaries distribution at
http://www.apache.org/dist/httpd/binaries/win32/,
file name apache_1.3.29-win32-x86-no_src.exe.
When you have the exe file double click it to run the installation wizard.
You will be prompted with several installation screens.
You will be asked to enter a Network domain
(I used cs.laurentian.ca), a server name
(I used c2206.cs.laurentian.ca), and an administrator
email address (I used fred@cs.laurentian.ca).
If you will be putting your server on a network enter the appropriate
values for these.
We will only need to use Apache locally as a development server so any
names will do.
You will be asked if you want to install Apache as a service that runs automatically every time you start windows or run it when started manually. For a dedicated production web server you would probably choose to install Apache as a service which would automatically start. However, since we are using Apache as a development server it is more appropriate to install it to run when started manually. Choose this option (it is assumed in the notes below).
Make sure you select "Complete" setup or you won't get the documentation.
Also the default installation directory is
C:\Program Files\Apache Group\:Do not use this.
Instead choose browse and use C:\.
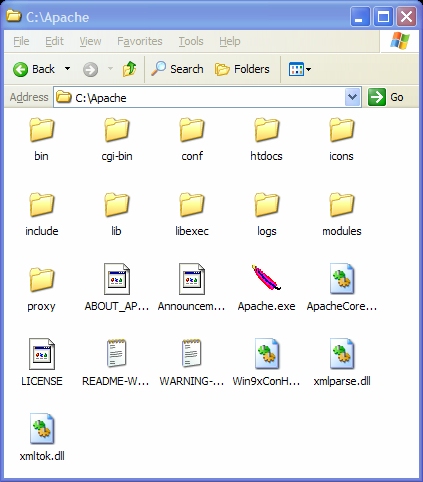
This will install the server in a top level directory called
c:\Apache which should look similar to
If you use another directory by mistake uninstall Apache and re-install it.
The apache server, Apache.exe, has the "feather" icon.
htdocs directory is the HTML document root.
All HTML documents
must be placed in this directory and its subdirectories.cgi-bin directory traditionally contains Perl scripts.logs directory contains server log files
which can be checked for connections and errors.conf directory contains the server configuration files
which are read each time Apache starts up.Apache.exe file
(the one with the feather icon in directory c:\Apache)
on the desktop and rename it to "Start Apache",C:\Apache\Apache.exe -k restart,
C:\Apache\Apache.exe -k shutdown.
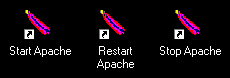
Apache/1.3.29 (Win32) running...
You can minimize this window while the server is running.
Now click the "Restart Apache" icon. This does not stop the server. Instead if forces the server to re-read its configuration files. This is a useful command when you are testing modifications to these files.
Now click the "Stop Apache" icon and the minimized command window will disappear.
http://localhost/You should see the default Apache home page (
index.html).

http://localhost/manual/The trailing slash is absolutely necessary! Note that the documentation can only be viewed properly this way if the server is running.
htdocs directory and you will see many
index files for various languages.
You can either delete them all or
move them into some other directory
so they don't clutter your document directory.
I move them to a directory called languages so
my initial htdocs directory looks like
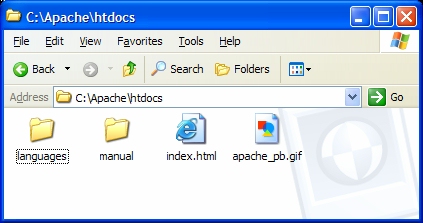
You won't have the file index.html yet.
Subdirectory manual contains the Apache HTML documentation.
The file apache_pb.gif contains the "powered by apache"
feather icon which you can include on your web site if you want to advertise
that you are running the apache web server.
To test everything create the following short home page
index.html in the htdocs directory.
<html>
<head><title>My Home Page</title></head>
<body>
<h1>My Home Page</h1>
<img src="apache_pb.gif"/>
</body>
</html>
Now use localhost again as your browser URL to obtain

The default page in any directory is called index.html.
This means thatyou can use the URL localhost instead of
the full URL localhost/index.html.
We chose to install Apache to be started and stopped manually
from a command prompt.
When using your home computer as a development server
this is the best choice.
If you want to install Apache as a service you can use the command
(from directory c:\Apache)
apache -i -n "Apache"Similarly if Apache is installed as a service it can be uninstalled as a service using the command (from directory
c:\Apache)
apache -u -n "Apache"For more information see the Apache documentation.
To configure Apache for script execution it may be necessary to
modify the configuration file httpd.conf in
directory C:\Apache\conf.
There are many ways to do this depending on whether you want users to
be able to execute scripts in their own cgi-bin directory
or in another special directory.
In our case we are the only user so the configuration is easy.
In fact Apache should already be configured properly for executing
scripts from the cgi-bin directory.
We won't discuss the details but there can be security problems if
Apache is not set up properly for script execution.
To check this load the file httpd.conf file into an editor (it may
be too large for notepad) and scroll down until you find the following lines
# ScriptAlias: This controls which directories contain server scripts.
# ScriptAliases are essentially the same as Aliases, except that
# documents in the realname directory are treated as applications and
# run by the server when requested rather than as documents sent to the client.
# The same rules about trailing "/" apply to ScriptAlias directives as to
# Alias.
#
ScriptAlias /cgi-bin/ "C:/Apache/cgi-bin/"

#
# "C:/Apache/cgi-bin" should be changed to whatever your ScriptAliased
# CGI directory exists, if you have that configured.
#
<Directory "C:/Apache/cgi-bin">
    AllowOverride None
    Options None
    Order allow,deny
    Allow from all
</Directory>
If this is what you see then Apache is properly configured for executing
CGI scripts in the cgi-bin directory.
Lines that begin with # are comments.
To illustrate this method first create a subdirectory called
secret below your htdocs directory.
Now create a file outside the document tree,
in C:\Apache for example, called password.txt.
In this file put the line
look:kool
fred:jones
This indicates that
look is a user name and kool
is the password and similarly for other user names and passwords in the file.
Now edit the httpd.conf file and include the
Directory entry
<Directory "C:/Apache/htdocs/secret">
Options Indexes
AllowOverride none
Order allow,deny
Allow from all
AuthType Basic
AuthName "My Web"
AuthUserFile "C:/Apache/password.txt"
Require valid-user
</Directory>
Make sure you put these lines outside other
Directory
entries. A good place is just below the main directory entry
<Directory "C:/Apache/htdocs">
...
...
</Directory>
Now put the following
index.html file in the
secret directory.
<html>
<head><title>The Secret Home Page</title></head>
<body>
<h1>The Secret Home Page</h1>
This is the secret home page
</body>
</html>
Restart the server. When you try the URL
http://localhost/secret/you will be asked for a user name and password that is in
password.txt.
htpasswd.exe in
directory c:\Apache\bin.
Open a command prompt and navigate to this directory and issue the
following command
htpasswd -c password.txt lookWhen prompted with the password use
kool.
Here the -c option means to create the file
password.txt and make an entry for user look.
(WARNING: Do not use the -c option for an existing
password file or the file will be recreated and you will lose all your
user names and passwords.)
Add the second user with the command
htpasswd password.txt fredNow copy the password file to
c:\Apache. If you view
this file with an editor you will see something like
look:$apr1$Ww3.....$SbpKTSwXsci9Jb5X0sgsr/
fred:$apr1$Bx3.....$ewA62P4FxdBYnZbz/.9f71
Although SSI (server side includes) is an old technology you may want to
configure Apache to allow it. Html files that are to be parsed for Server Side
Includes have the file extension shtml instead of html.
This requires some additions to the httpd.conf file as
shown below (see comment lines beginning BGA)
# Note that "MultiViews" must be named *explicitly* --- "Options All"
# doesn't give it to you.
#
# BGA: added Includes to following list so that SSI works in htdocs

    Options Indexes FollowSymLinks MultiViews Includes

#
# This controls which options the .htaccess files in directories can
# override. Can also be "All", or any combination of "Options", "FileInfo",
# "AuthConfig", and "Limit"
#
    AllowOverride None

# BGA: Added following two lines

   AddType text/html .shtml
   AddHandler server-parsed .shtml

#
# Controls who can get stuff from this server.
#
    Order allow,deny
    Allow from all
# # DirectoryIndex: Name of the file or files to use as a pre-written HTML # directory index. Separate multiple entries with spaces. # # BGA added index.shtml to listDirectoryIndex index.html index.shtml # # AccessFileName: The name of the file to look for in each directory # for access control information. # AccessFileName .htaccess