There are two versions of MySQL on the CD-ROM.
These notes were written for version 4.0.16.
This version is available on the CD-ROM in directory
\software\mysql as the zip file
mysql-4.0.16-win.zip or it can be found at
www.mysql.com.
For COSC 2206 you can install version 4.0.16.
The latest stable version of MySQL is 4.0.20d.
This version is available on the CD-ROM in directory
\software\mysql as the zip file
mysql-4.0.20d-win.zip or it can be found at
www.mysql.com.
The installation of this version should be similar to 4.0.16
although some of the screen shots in these notes may be different.
If you use WinZip you can install it directly using WinZip's install button.
In any case the file Setup.exe is used to install MySQL.
(To uninstall MySQL use Add/Remove Programs from the Control Panel.)
WARNING: If you do not install on drive C: mysql
will not work unless extra configuration is specified in
an initialization file.
Choose the standard installation directory c:\mysql.
Also choose the Custom install option and make sure all items are checked.
When installation is complete open a directory window for
c:\mysql and you should see something like this:
The bin directory contains some useful utility programs and
some command line clients as well as several versions of MySQL.
The data directory contains databases stored in MySQL's
internal form.
The Docs directory has the complete documentation for MySQL.
We will discuss it later in these notes.
To install MySQL as a service you will need to open a Command Prompt window. To do this locate the Command Prompt in the Accessories directory under Programs on the start menu. Right click and drag it to your desktop. Now you can double click this shortcut every time you want to open a Command Prompt
Open the Command Prompt and navigate to directory c:\mysql\bin.
In case MySQL is already installed as a service from a previous version of MySQL
use the following command to uninstall it as a service.
C:\>cd \mysql\bin
C:\mysql\bin>mysqld-nt  --remove
Service successfully removed.
If MySQL was not already installed as a service you will see
C:\mysql\bin>mysqld-nt  --remove
The service doesn't exist!
Now to install it as a service that can be started and stopped manually you can use the command (no spaces in
--install-manual).
C:\mysql\bin>mysqld-nt  --install-manual
Service successfully installed.
If you go to "Control Panel" -> "Adminstrative Tools" -> "Services" you should now find the line

MySQL can be started and stopped by double clicking on the MySql line in "Services" but it is much easier to start and stop the server using a Command Prompt or shortcuts on the desktop. The command to start the server is
net start MySqland the command to stop the server is
net stop MySqlTry these commands and you should see
C:\>net start MySql
The MySql service is starting.
The MySql service was started successfully.

C:\>net stop MySql
The MySql service is stopping.
The MySql service was stopped successfully.
Now make two Command Prompt shortcuts on the desktop.
Rename one of them to MySql Start and rename the other to
MySql Stop.
Now right click on each shortcut, select properties and in the target
text field enter
C:\windows\system32\net.exe start MySqlfor the start shortcut and
C:\windows\system32\net.exe stop MySqlfor the stop shortcut.
Now you can use these shortcuts to manually start and stop the server.
There are other ways to start and stop the server but this is the simplest
(another common way is to use the winmysqladmin.exe tool
located in c:\mysql\bin but we won't do this).
There are many clients available for MySQL. We will look at two:
mysql that is part of
the MySQL distributionMyCC
(My Control Center) that we will install laterNow that we have the MySQL server running we can connect to it using a client program. MySQL maintains its user names, passwords, and database permissions data in a MySQL database. By default the server is "wide open" meaning there are no passwords set, not even for the root account. This is OK for now since we haven't created any databases to protect. Soon we will show how to set a root password and create other accounts.
The full path of the standard client program is c:\mysql\bin\mysql.exe.
Open a Command Prompt and navigate to
directory c:\mysql\bin.
Now use the following mysql command and you will see something like
C:\mysql\bin>mysql -uroot
Welcome to the MySQL monitor.  Commands end with ; or \g.
Your MySQL connection id is 2 to server version: 4.0.16-nt

Type 'help;' or '\h' for help. Type '\c' to clear the buffer.

mysql>
Here the
-uroot command line argument indicates
that we are logging on as user root which initially
has no password.
The mysql> prompt indicates
that the mysql client is waiting for you to enter
MySQL and SQL commands to send to the MySQL server.
A relational database system such as MySQL consists of one or more databases and each database consists of one or more tables.
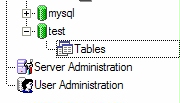
To test that the server is working show the databases that are available:
mysql> show databases;
+----------+
| Database |
+----------+
| mysql    |
| test     |
+----------+
2 rows in set (0.00 sec)
mysql>
This indicates that initially there are two databases:
the mysql
database contains user names, passwords, and access rights for
hosts and databases,
and the test database can be used by anyone
to test the server.
(The internal files corresponding to these databases can be found
in directory c:\mysql\data).
Never delete the mysql database!
As a simple test make mysql the current database and
use a select command to display part of its user table
as follows.
mysql> use mysql;
Database changed
mysql> select user, host, password from user;
+------+-----------+----------+
| user | host      | password |
+------+-----------+----------+
| root | localhost |          |
| root | %         |          |
|      | localhost |          |
|      | %         |          |
+------+-----------+----------+
4 rows in set (0.01 sec)

mysql>
NOTE: This display and following discussion may be different for
versions of MySQL later than 4.0.16.
The two versions of the anonymous account have blank user and password fields.
The % character in the host field is a wildcard indicating that
any host can connect from anywhere on the internet.
Thus one version can be accessed using only localhost and
the other can be accessed from any user on the internet.
We do not need these accounts and will delete them later
Similarly there are two versions of the root account with no password.
Both have maximum privileges so the server is "wide-open" until
we set passwords.
On our development server we only need to access the server using
localhost so we could delete the other root account.
In a production environment it might be common to have the web server on
one machine and the database server on another machine so we would need
to have a host other than localhost.
NOTE: This section may be different for
versions of MySQL later than 4.0.16.
To remove the two anonymous users we first use the use mysql
command to specify the mysql database
and then use the SQL delete command on the user table
in this database as follows.
C:\mysql\bin>mysql -uroot
Welcome to the MySQL monitor.  Commands end with ; or \g.
Your MySQL connection id is 8 to server version: 4.0.16-nt

Type 'help;' or '\h' for help. Type '\c' to clear the buffer.

mysql> use mysql;
Database changed
mysql> DELETE FROM user WHERE host='localhost' AND user='';
Query OK, 1 row affected (0.02 sec)

mysql> DELETE FROM user WHERE host='%' AND user='';
Query OK, 1 row affected (0.00 sec)

mysql>
To check that the accounts were deleted use the
flush
and select commands:
mysql> flush tables;
mysql> select user, host, password from user;
+------+-----------+----------+
| user | host      | password |
+------+-----------+----------+
| root | localhost |          |
| root | %         |          |
+------+-----------+----------+
2 rows in set (0.00 sec)

mysql>
NOTE: This section may be different for
versions of MySQL later than 4.0.16.
Now we can set a root password using the update command
(replace xxxx by your password and don't forget it):
mysql> UPDATE user SET Password=PASSWORD('xxxx') WHERE User='root';
Query OK, 2 rows affected (0.00 sec)
Rows matched: 2  Changed: 2  Warnings: 0

mysql> flush tables;
mysql> flush privileges;
mysql> select user, host, password from user;
+------+-----------+------------------+
| user | host      | password         |
+------+-----------+------------------+
| root | localhost | 64cf85d66b615334 |
| root | %         | 64cf85d66b615334 |
+------+-----------+------------------+
2 rows in set (0.00 sec)

mysql>
Now we have two versions of the root account both having the password
you set.
If you do not want to access the server remotely (from another machine)
you can delete the second account that shows % in the
host field using the command
mysql> DELETE FROM user WHERE host='%' AND user='root';
mysql> flush tables;
mysql> flush privileges;
In either case the server is now secure.
To make these changes to the user table take effect we have used the
flush command.
Now to use the client it will be necessary to use the following command
C:\mysql\bin>mysql -uroot -p
Enter password: ********
Welcome to the MySQL monitor.  Commands end with ; or \g.
Your MySQL connection id is 3 to server version: 4.0.16-nt

Type 'help;' or '\h' for help. Type '\c' to clear the buffer.

mysql> quit;
Here
-u specifies the user and -p specifies
that a prompt for the password is displayed.
mysqladmin:
c:\mysql\bin> mysqladmin -u root -p password yyyyy
Enter password: ********
where
yyyyy is the new password: if you haven't yet set
any password then just press enter when prompted for the current password.
This client can be be obtained from the course CD in directory
\software\mysql as the zip file
mysqlcc-0.9.3-win32.zip. There is also a later version
mysqlcc-0.9.4-win32.zip but these notes were written for
version 0.9.3.
Use WinZip to open this file. You can either use WinZip's install feature
(zip file contains a setup.exe file) to install MyCC or
you can unzip everything into a temporary directory execute
setup.exe and delete the temporary directory when the
installation is complete.
MyCC maintains configuration settings in Documents and Settings
in a directory under your user name called .mysqlcc (directory
name begins with a dot). You can delete this directory if you want to
reset MyCC to its default settings.
During installation accept all the defaults and the install directory. When installation finishes there will be a MySQL control center icon on the desktop. Double click it to see that initial startup screen.
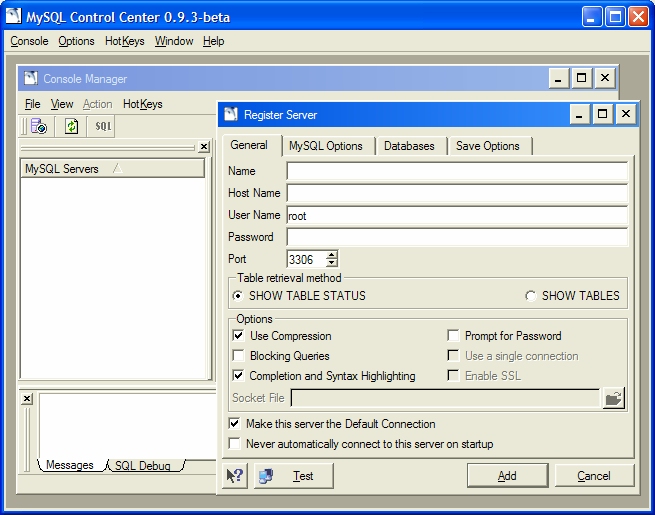
To register the server do the following:
My Server in the name fieldlocalhost in the Host Name field
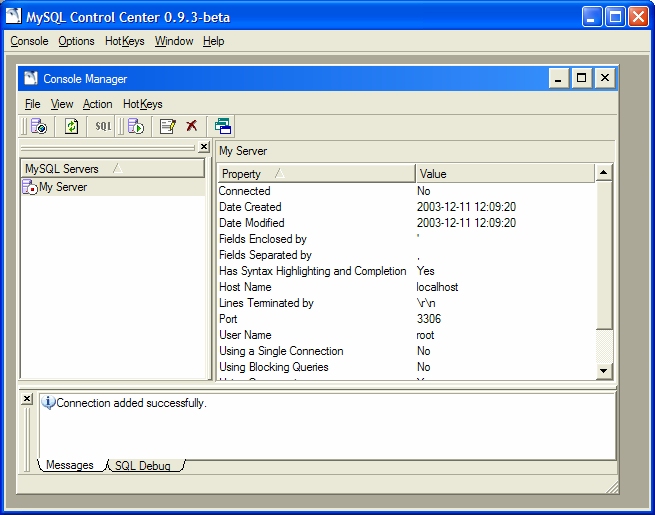
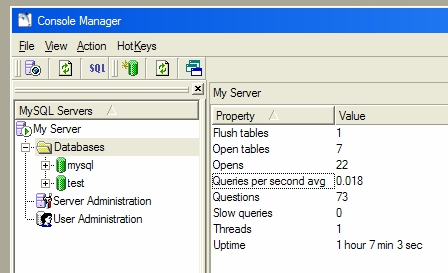
Notice that a My Server entry appears in the left panel. Double click it to see
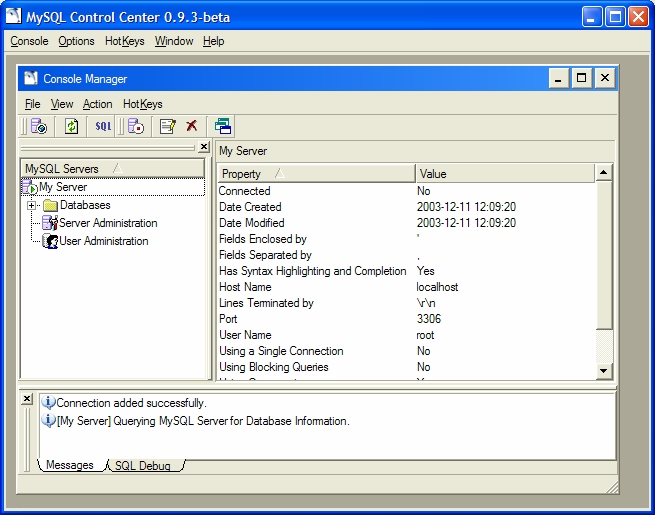
You can open the lists to see something simiar to
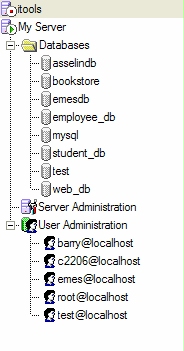
You should see your databases and user accounts such as
the root account root@localhost that you created earlier.
You can easily create and delete accounts or change privileges
For example if you double click on root@localhost you will see
the window
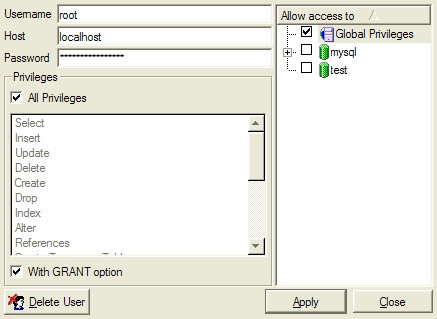
WARNING: Don't change any properties of the root account other than the password, since this account has maximum privileges (access to all tables, privileges, and grant option). You can change the properties of other accounts here and also set up new accounts with various privileges. Notice that the root account has maximum privileges.
c2206
on our local machines for use in the course assignments and project.
To create this new account right click on the "User Administration" entry and
choose "New User". Enter the name c2206, enter the host
localhost, enter the password
which will be given to you in class,
check the "Global Privileges" box
in the right pane, check "All Privileges", and check "With GRANT option".
Finally click the Add button.
You now have an account called c2206
with the same privileges as root.
This account appears under the "User Administration" list as
c2206@localhost.
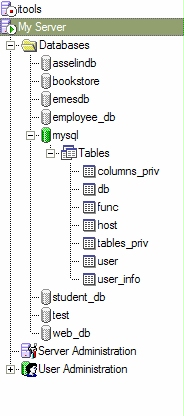
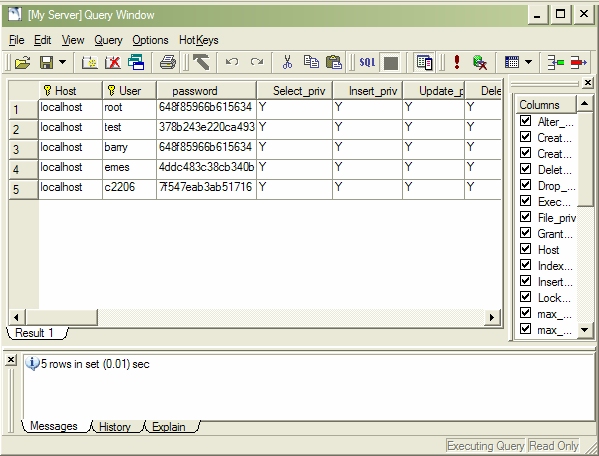
Now double click on the user table to see its contents:
c:\mysql\Docs.
Load the file c:\mysql\Docs\manual_toc.html into a browser
to see the table
of contents. Each link is connected to the large manual.html file.
For windows users there is a searchable version in windows help (chm) format.
It can downloaded from www.mysql.com and
it is also available on the CD in the file \software\mysql\manual.chm.
You can copy it to directory c:\mysql\Docs.
The following script books.sql
can be used to create a
table called books
in a database called web_db.
# File: books.sql
# A sample database of books for an online bookstore

CREATE DATABASE IF NOT EXISTS web_db;
USE web_db;

# The books table holds all the information on the books in the bookstore

CREATE TABLE books
(
  isbn   CHAR(15)       PRIMARY KEY NOT NULL,
  title  VARCHAR(100)   NOT NULL,
  author VARCHAR(100)   NOT NULL,
  pub    VARCHAR(20)    NOT NULL,
  year   year           NOT NULL,
  price  DECIMAL(9,2)   DEFAULT NULL
);

INSERT INTO books VALUES (
   '0-672-31784-2',
   'PHP and MySQL Web Development',
   'Luke Welling, Laura Thomson',
   'Sams', 2001, 74.95
);

INSERT INTO books VALUES (
   '0-13-066190-2',
   'Core MySQL',
   'Leon Atkinson',
   'Prentice Hall PTR', 2001, 68.00
);

INSERT INTO books VALUES (
   '1-861003-02-1',
   'Professional Apache',
   'Peter Wainwright',
   'Wrox Press Ltd', 1999, 74.95
);

INSERT INTO books VALUES (
   '0-13-089793-0',
   'Core WEB Programming, 2nd Ed',
   'Marty Hall, Larry Brown',
   'Prentice Hall PTR', 2001, 75.00
);

INSERT INTO books VALUES (
   '0-672-31880-6',
   'CGI in 24 Hours',
   'Rafe Colburn',
   'Sams', 2000, 37.95
);

INSERT INTO books VALUES (
   '1-861003-14-5',
   'Beginning Perl',
   'Simon Cozens',
   'Wrox Press Ltd', 2000, 59.95
);

INSERT INTO books VALUES (
   '0-596-00027-8',
   'Programming Perl, 3rd Ed',
   'Larry Wall, Tom Christianson, Jon Orwant',
   'O\'Reilly', 2000, 72.95
);

INSERT INTO books VALUES (
   '1-56592-243-3',
   'Perl Cookbook',
   'Tom Christianson, Nathan Torkington',
   'O\'Reilly', 1999, 56.95
);
We can use MyCC to execute this script as follows. From the MyCC Console manager click the button that has "SQL" on it:
This gives the Query Window
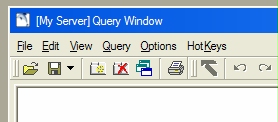
so choose "Open" from the "File" menu and navigate to locate books.sql
(It is also on the CD as \install-notes\mysql\books.sql)
The SQL file will be loaded into the editor:
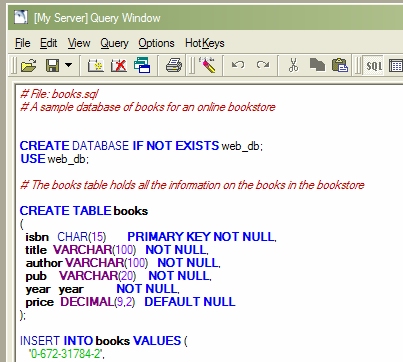
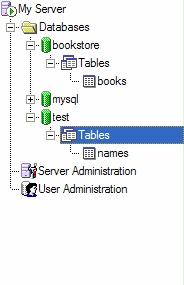
Finally chooose "Execute" from the "Query" menu and the database table will be created. To check that it exists close the query window, right click on the Databases folder in the left pane,
choose refresh and web_db will appear in the list of databases.
You can now expand the web_db tab:
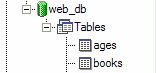
Now double click the books entry to obtain data in the table
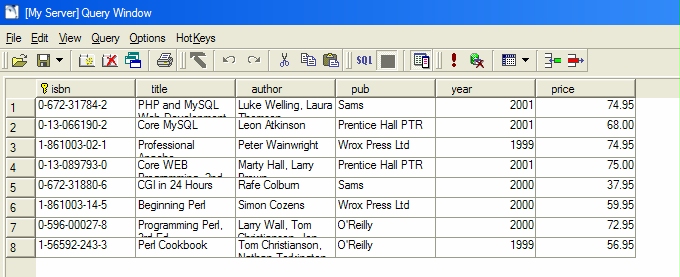
and the table structure
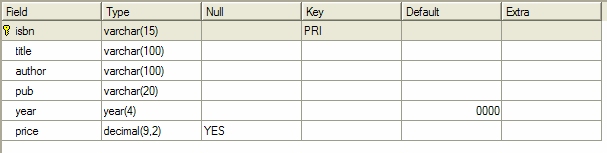
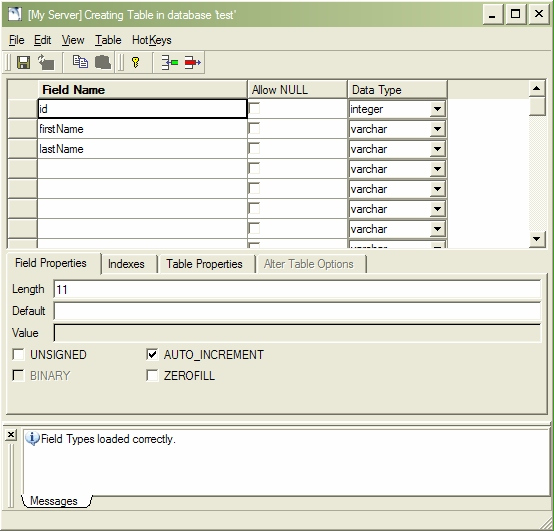
names that
has three fields. The first field is a primary key field called id
that is an auto-incrementing integer, the second field is called
firstName with datatype varchar(20) and the third
field is called lastName with datatype varchar(20).
We will use the test database for this example so navigate to
its tables entry:
right click on the Tables entry and choose "New Table" to obtain

Now enter the three fields noting that the button with the yellow key is
used to indicate that a field should be a primary key.
Make the id field an integer with length of 11,
the firstName field a varchar field of length 20,
and the lastName field a varchar field of length 20.
Don't forget to
check the autoincrement box for the id field as shown below:
Now exit this window and you will be asked to name the table. Give it the
name names.
You will now see the table in the database table list.
Now double click the names entry in the list to obtain the
window
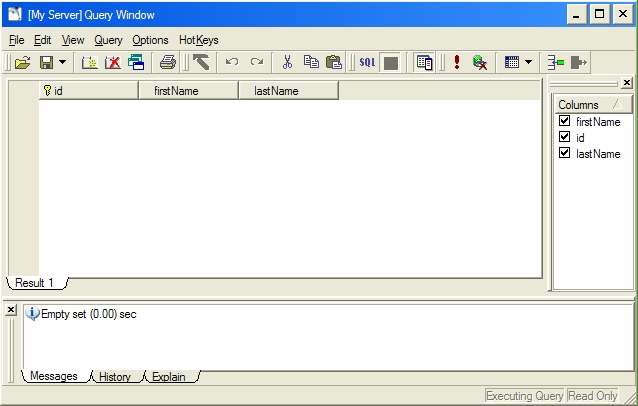
From the "Query" menu choose "Insert Record" and add some records.
Don't enter values for the id field since it is automatically
generated, and press enter after entering the data for each record:

Exit this window when you are finished.
mysqldump command in directory
c:\mysql\bin.
For example to dump the web_db database tables try
the following command from directory c:\mysql\bin:
mysqldump -u root -p web_db > web_db_dump.sqlThis will create the file
web_db_dump.sql in
directory c:\mysql\bin. You can move it to any
directory. The file created can be read back into MySQL.
This is a simple way to backup databases.
employee_db.sql
or save typing and get it here:
employee_db.sql.
--
-- A simple employee database illustrating how a primary
-- key in one table can be used in another table (foreign key).
-- Each employee has an id number.
--
-- The jobs table records the number of hours an employee
-- has worked. It also contains an employee ID
-- to indicate which employee is being referenced.
--
-- This table could be expanded to include a job id to
-- refer to the type of each job.

CREATE DATABASE IF NOT EXISTS employee_db;
USE employee_db;
DROP TABLE IF EXISTS employees;
DROP TABLE IF EXISTS jobs;

CREATE TABLE employees
(
   employeeID SMALLINT NOT NULL,
   name VARCHAR(20) NOT NULL,
   position VARCHAR(20) NOT NULL,
   address VARCHAR(40) NOT NULL,
   PRIMARY KEY (employeeID)
) TYPE=MyISAM;


CREATE TABLE jobs
(
   employeeID SMALLINT NOT NULL,
   hours DECIMAL(5,2) NOT NULL
) TYPE=MyISAM;

--
-- Create some employee entries
--

INSERT INTO employees VALUES (1001, 'Fred', 'programmer', '13 Windle St');
INSERT INTO employees VALUES (1002, 'Joan', 'programmer', '23 Rock St');
INSERT INTO employees VALUES (1003, 'Bill', 'manager', '37 Front St');

--
-- Create some job entries
--

INSERT INTO jobs VALUES (1001, 13.5);
INSERT INTO jobs VALUES (1002, 2);
INSERT INTO jobs VALUES (1002, 6.25);
INSERT INTO jobs VALUES (1003, 4);
INSERT INTO jobs VALUES (1001, 1);
INSERT INTO jobs VALUES (1003, 7);
INSERT INTO jobs VALUES (1003, 9.5);
Put this file in a directory and read it into MySQL using the following command at the MySQL prompt:
mysql> source c:/.........../employee_db.sqlor use the MyCC GUI client program.
Now try the following select commands.
mysql> use employee_db
Database changed
mysql> SELECT * FROM employees;
+------------+------+------------+--------------+
| employeeID | name | position   | address      |
+------------+------+------------+--------------+
|       1001 | Fred | programmer | 13 Windle St |
|       1002 | Joan | programmer | 23 Rock St   |
|       1003 | Bill | manager    | 37 Front St  |
+------------+------+------------+--------------+
3 rows in set (0.01 sec)

mysql> SELECT * FROM jobs;
+------------+-------+
| employeeID | hours |
+------------+-------+
|       1001 | 13.50 |
|       1002 |  2.00 |
|       1002 |  6.25 |
|       1003 |  4.00 |
|       1001 |  1.00 |
|       1003 |  7.00 |
|       1003 |  9.50 |
+------------+-------+
7 rows in set (0.00 sec)

mysql> SELECT * FROM employees, jobs;
+------------+------+------------+--------------+------------+-------+
| employeeID | name | position   | address      | employeeID | hours |
+------------+------+------------+--------------+------------+-------+
|       1001 | Fred | programmer | 13 Windle St |       1001 | 13.50 |
|       1002 | Joan | programmer | 23 Rock St   |       1001 | 13.50 |
|       1003 | Bill | manager    | 37 Front St  |       1001 | 13.50 |
|       1001 | Fred | programmer | 13 Windle St |       1002 |  2.00 |
|       1002 | Joan | programmer | 23 Rock St   |       1002 |  2.00 |
|       1003 | Bill | manager    | 37 Front St  |       1002 |  2.00 |
|       1001 | Fred | programmer | 13 Windle St |       1002 |  6.25 |
|       1002 | Joan | programmer | 23 Rock St   |       1002 |  6.25 |
|       1003 | Bill | manager    | 37 Front St  |       1002 |  6.25 |
|       1001 | Fred | programmer | 13 Windle St |       1003 |  4.00 |
|       1002 | Joan | programmer | 23 Rock St   |       1003 |  4.00 |
|       1003 | Bill | manager    | 37 Front St  |       1003 |  4.00 |
|       1001 | Fred | programmer | 13 Windle St |       1001 |  1.00 |
|       1002 | Joan | programmer | 23 Rock St   |       1001 |  1.00 |
|       1003 | Bill | manager    | 37 Front St  |       1001 |  1.00 |
|       1001 | Fred | programmer | 13 Windle St |       1003 |  7.00 |
|       1002 | Joan | programmer | 23 Rock St   |       1003 |  7.00 |
|       1003 | Bill | manager    | 37 Front St  |       1003 |  7.00 |
|       1001 | Fred | programmer | 13 Windle St |       1003 |  9.50 |
|       1002 | Joan | programmer | 23 Rock St   |       1003 |  9.50 |
|       1003 | Bill | manager    | 37 Front St  |       1003 |  9.50 |
+------------+------+------------+--------------+------------+-------+
21 rows in set (0.01 sec)

mysql> SELECT name, hours FROM employees, jobs
    -> WHERE employees.employeeID = jobs.employeeID;
+------+-------+
| name | hours |
+------+-------+
| Fred | 13.50 |
| Joan |  2.00 |
| Joan |  6.25 |
| Bill |  4.00 |
| Fred |  1.00 |
| Bill |  7.00 |
| Bill |  9.50 |
+------+-------+
7 rows in set (0.00 sec)

mysql> SELECT name, hours FROM employees NATURAL JOIN jobs;
+------+-------+
| name | hours |
+------+-------+
| Fred | 13.50 |
| Joan |  2.00 |
| Joan |  6.25 |
| Bill |  4.00 |
| Fred |  1.00 |
| Bill |  7.00 |
| Bill |  9.50 |
+------+-------+
7 rows in set (0.00 sec)

mysql> SELECT name, hours FROM employees, jobs WHERE
    -> employees.employeeID = jobs.employeeID AND name = 'Fred';
+------+-------+
| name | hours |
+------+-------+
| Fred | 13.50 |
| Fred |  1.00 |
+------+-------+
2 rows in set (0.00 sec)

mysql> SELECT name, SUM(hours) FROM employees, jobs WHERE
    -> employees.employeeID = jobs.employeeID GROUP BY name;
+------+------------+
| name | SUM(hours) |
+------+------------+
| Bill |      20.50 |
| Fred |      14.50 |
| Joan |       8.25 |
+------+------------+
3 rows in set (0.00 sec)

mysql> SELECT name, SUM(hours) FROM employees, jobs WHERE
    -> employees.employeeID = jobs.employeeID AND name = 'Fred'
    -> GROUP BY name;
+------+------------+
| name | SUM(hours) |
+------+------------+
| Fred |      14.50 |
+------+------------+
1 row in set (0.00 sec)

mysql>
student_db.sql
or save typing and get it here:
student_db.sql.
DROP DATABASE IF EXISTS student_db;
CREATE DATABASE student_db;
USE student_db;

CREATE TABLE students
(
   studentID SMALLINT NOT NULL,
   first_name VARCHAR(20) NOT NULL,
   last_name VARCHAR(20) NOT NULL,
   other VARCHAR(50) default '' NOT NULL,
   PRIMARY KEY (studentID)
) TYPE=MyISAM;


CREATE TABLE courses
(
   courseID SMALLINT NOT NULL,
   dept_code CHAR(4) NOT NULL,
   dept_number CHAR(4) NOT NULL,
   lang CHAR(1) default 'E' NOT NULL,
   section CHAR(2) default '01' NOT NULL,
   description VARCHAR(50) default '' NOT NULL,
   PRIMARY KEY (courseID)
) TYPE=MyISAM;

CREATE TABLE classes
(
   courseID SMALLINT NOT NULL,
   studentID SMALLINT NOT NULL
) TYPE=MyISAM;

--
-- Create some students
--

INSERT INTO students VALUES (12345, 'Fred', 'Jones', '');
INSERT INTO students VALUES (12346, 'June', 'Jones', '');
INSERT INTO students VALUES (12347, 'Bill', 'Franks', '');
INSERT INTO students VALUES (12348, 'Jane', 'Simpson', '');
INSERT INTO students VALUES (12349, 'Gord', 'Smith', '');
INSERT INTO students VALUES (12350, 'Jim', 'Carter', '');
INSERT INTO students VALUES (12351, 'Bob', 'Marley', '');
INSERT INTO students VALUES (12352, 'Linda', 'Boyer', '');
INSERT INTO students VALUES (12353, 'Carol', 'Jenkins', '');

INSERT INTO students VALUES (22345, 'Ralph', 'Martin', '');
INSERT INTO students VALUES (22346, 'Stephen', 'Jenkins', '');
INSERT INTO students VALUES (22347, 'Lorrie', 'Stevens', '');
INSERT INTO students VALUES (22348, 'Andrew', 'Collins', '');
INSERT INTO students VALUES (22349, 'Barbara', 'Parker', '');
INSERT INTO students VALUES (22350, 'Bill', 'Brady', '');

--
-- Create some courses for them to take
--

INSERT INTO courses VALUES (1, 'MATH', '1036', 'E', '01', 'Calculus I');
INSERT INTO courses VALUES (2, 'MATH', '1037', 'E', '01', 'Calculus II');
INSERT INTO courses VALUES (3, 'COSC', '1046', 'E', '01', 'Computer Science I');
INSERT INTO courses VALUES (4, 'COSC', '1047', 'E', '01', 'Computer Science II');
INSERT INTO courses VALUES (5, 'COSC', '2206', 'E', '01', 'Internet Tools');

--
-- Create some classes of students
--

INSERT INTO classes VALUES (1, 12345);
INSERT INTO classes VALUES (1, 12346);
INSERT INTO classes VALUES (1, 12353);


INSERT INTO classes VALUES (2, 12345);
INSERT INTO classes VALUES (2, 12346);
INSERT INTO classes VALUES (2, 12353);
INSERT INTO classes VALUES (2, 12348);


INSERT INTO classes VALUES (3, 12345);
INSERT INTO classes VALUES (3, 12346);
INSERT INTO classes VALUES (3, 12347);
INSERT INTO classes VALUES (3, 12348);
INSERT INTO classes VALUES (3, 12349);
INSERT INTO classes VALUES (3, 12350);
INSERT INTO classes VALUES (3, 12351);
INSERT INTO classes VALUES (3, 12352);
INSERT INTO classes VALUES (3, 12353);

INSERT INTO classes VALUES (4, 12345);
INSERT INTO classes VALUES (4, 12346);
INSERT INTO classes VALUES (4, 12347);
INSERT INTO classes VALUES (4, 12348);
INSERT INTO classes VALUES (4, 12349);
INSERT INTO classes VALUES (4, 12350);

INSERT INTO classes VALUES (5, 22345);
INSERT INTO classes VALUES (5, 22346);
INSERT INTO classes VALUES (5, 22347);
INSERT INTO classes VALUES (5, 22348);
INSERT INTO classes VALUES (5, 22349);
INSERT INTO classes VALUES (5, 22350);
Put this file in a directory and read it into MySQL using the following command at the MySQL prompt:
mysql> source c:/.........../student_db.sqlor use the MyCC GUI client program.
Now try the following select commands.
mysql> use student_db;
Database changed
mysql> SELECT * FROM students;
+-----------+------------+-----------+-------+
| studentID | first_name | last_name | other |
+-----------+------------+-----------+-------+
|     12345 | Fred       | Jones     |       |
|     12346 | June       | Jones     |       |
|     12347 | Bill       | Franks    |       |
|     12348 | Jane       | Simpson   |       |
|     12349 | Gord       | Smith     |       |
|     12350 | Jim        | Carter    |       |
|     12351 | Bob        | Marley    |       |
|     12352 | Linda      | Boyer     |       |
|     12353 | Carol      | Jenkins   |       |
|     22345 | Ralph      | Martin    |       |
|     22346 | Stephen    | Jenkins   |       |
|     22347 | Lorrie     | Stevens   |       |
|     22348 | Andrew     | Collins   |       |
|     22349 | Barbara    | Parker    |       |
|     22350 | Bill       | Brady     |       |
+-----------+------------+-----------+-------+
15 rows in set (0.00 sec)

mysql> SELECT * FROM courses;
+----------+-----------+-------------+------+---------+---------------------+
| courseID | dept_code | dept_number | lang | section | description         |
+----------+-----------+-------------+------+---------+---------------------+
|        1 | MATH      | 1036        | E    | 01      | Calculus I          |
|        2 | MATH      | 1037        | E    | 01      | Calculus II         |
|        3 | COSC      | 1046        | E    | 01      | Computer Science I  |
|        4 | COSC      | 1047        | E    | 01      | Computer Science II |
|        5 | COSC      | 2206        | E    | 01      | Internet Tools      |
+----------+-----------+-------------+------+---------+---------------------+
5 rows in set (0.00 sec)

mysql> SELECT * FROM classes;
+----------+-----------+
| courseID | studentID |
+----------+-----------+
|        1 |     12345 |
|        1 |     12346 |
|        1 |     12353 |
|        2 |     12345 |
|        2 |     12346 |
|        2 |     12353 |
|        2 |     12348 |
|        3 |     12345 |
|        3 |     12346 |
|        3 |     12347 |
|        3 |     12348 |
|        3 |     12349 |
|        3 |     12350 |
|        3 |     12351 |
|        3 |     12352 |
|        3 |     12353 |
|        4 |     12345 |
|        4 |     12346 |
|        4 |     12347 |
|        4 |     12348 |
|        4 |     12349 |
|        4 |     12350 |
|        5 |     22345 |
|        5 |     22346 |
|        5 |     22347 |
|        5 |     22348 |
|        5 |     22349 |
|        5 |     22350 |
+----------+-----------+
28 rows in set (0.00 sec)

mysql> SELECT first_name, last_name, description
    -> FROM students, courses, classes
    -> WHERE students.studentID = classes.studentID
    -> AND courses.courseID = classes.courseID;
+------------+-----------+---------------------+
| first_name | last_name | description         |
+------------+-----------+---------------------+
| Fred       | Jones     | Calculus I          |
| June       | Jones     | Calculus I          |
| Carol      | Jenkins   | Calculus I          |
| Fred       | Jones     | Calculus II         |
| June       | Jones     | Calculus II         |
| Carol      | Jenkins   | Calculus II         |
| Jane       | Simpson   | Calculus II         |
| Fred       | Jones     | Computer Science I  |
| June       | Jones     | Computer Science I  |
| Bill       | Franks    | Computer Science I  |
| Jane       | Simpson   | Computer Science I  |
| Gord       | Smith     | Computer Science I  |
| Jim        | Carter    | Computer Science I  |
| Bob        | Marley    | Computer Science I  |
| Linda      | Boyer     | Computer Science I  |
| Carol      | Jenkins   | Computer Science I  |
| Fred       | Jones     | Computer Science II |
| June       | Jones     | Computer Science II |
| Bill       | Franks    | Computer Science II |
| Jane       | Simpson   | Computer Science II |
| Gord       | Smith     | Computer Science II |
| Jim        | Carter    | Computer Science II |
| Ralph      | Martin    | Internet Tools      |
| Stephen    | Jenkins   | Internet Tools      |
| Lorrie     | Stevens   | Internet Tools      |
| Andrew     | Collins   | Internet Tools      |
| Barbara    | Parker    | Internet Tools      |
| Bill       | Brady     | Internet Tools      |
+------------+-----------+---------------------+
28 rows in set (0.02 sec)

mysql> SELECT CONCAT(first_name, ' ', last_name, ':', description)
    -> FROM students, courses, classes
    -> WHERE students.studentID = classes.studentID
    -> AND courses.courseID = classes.courseID;
+------------------------------------------------------+
| CONCAT(first_name, ' ', last_name, ':', description) |
+------------------------------------------------------+
| Fred Jones:Calculus I                                |
| June Jones:Calculus I                                |
| Carol Jenkins:Calculus I                             |
| Fred Jones:Calculus II                               |
| June Jones:Calculus II                               |
| Carol Jenkins:Calculus II                            |
| Jane Simpson:Calculus II                             |
| Fred Jones:Computer Science I                        |
| June Jones:Computer Science I                        |
| Bill Franks:Computer Science I                       |
| Jane Simpson:Computer Science I                      |
| Gord Smith:Computer Science I                        |
| Jim Carter:Computer Science I                        |
| Bob Marley:Computer Science I                        |
| Linda Boyer:Computer Science I                       |
| Carol Jenkins:Computer Science I                     |
| Fred Jones:Computer Science II                       |
| June Jones:Computer Science II                       |
| Bill Franks:Computer Science II                      |
| Jane Simpson:Computer Science II                     |
| Gord Smith:Computer Science II                       |
| Jim Carter:Computer Science II                       |
| Ralph Martin:Internet Tools                          |
| Stephen Jenkins:Internet Tools                       |
| Lorrie Stevens:Internet Tools                        |
| Andrew Collins:Internet Tools                        |
| Barbara Parker:Internet Tools                        |
| Bill Brady:Internet Tools                            |
+------------------------------------------------------+
28 rows in set (0.01 sec)

mysql> SELECT first_name, last_name, description
    -> FROM students, courses, classes
    -> WHERE students.studentID = classes.studentID
    -> AND courses.courseID = classes.courseID
    -> AND first_name = 'Fred'
    -> AND last_name = 'Jones';
+------------+-----------+---------------------+
| first_name | last_name | description         |
+------------+-----------+---------------------+
| Fred       | Jones     | Calculus I          |
| Fred       | Jones     | Calculus II         |
| Fred       | Jones     | Computer Science I  |
| Fred       | Jones     | Computer Science II |
+------------+-----------+---------------------+
4 rows in set (0.01 sec)
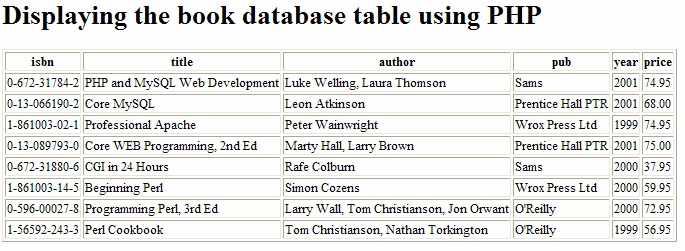
Here is a script called dbase_table.php
that can retrieve the books table from the
web_db database constructed above and display it as an
html table.
If you don't want to type it in it is available on the CD
in \install-notes\mysql\dbase_table.php or you can right
click (here) and save it in the directory
given below.
Here we are assuming a MySQL user name of c2206 and a
password of c2206.
<html>
<head><title>Displaying the books table using
PHP</title></head>
<body>
<h1>Displaying the books table using PHP</h1>
<?php
// Connect to server and select a database

$db_link = mysql_connect("localhost:3306", "c2206", "c2206")
   or die("Could not connect to local host");
mysql_select_db("web_db")
   or die("Could not select web_db database");

// Retrieve table properties

$fields = mysql_list_fields("web_db", "books");
$num_columns = mysql_num_fields($fields);

// Make a simple database query to select all columns and rows

$query = "SELECT * FROM books";
$result = mysql_query($query) or die("SQL query failed");

// Display results as an HTML table. Note how mysql_field_name
// uses the $fields object to extract the column names

echo '<table border="1">', "\n";

// Display the column names

echo "<tr>\n";
for ($i = 0; $i < $num_columns; $i++)
{
   echo "", mysql_field_name($fields, $i), "</th>\n";
}
echo "</tr>\n";

// Loop over the rows of the table.
// $line contains the information for each row

while ($row = mysql_fetch_assoc($result))
{
   // Now loop through the entries in each row

   echo "<tr>\n";
   foreach ($row as $col_value)
   {
      echo "<td>$col_value</td>\n";
   }
   echo "</tr>\n";
}
echo "</table>\n";

// Free the resources and close the connection

mysql_free_result($result);
mysql_close($db_link);
?>
</body>
</html>

Save this file in your testphp directory
(complete path is c:\Apache\htdocs\testphp\dbase_table.php).
Now make sure both Apache and MySQL are running and use the URL
http://localhost/testphp/dbase_table.php and you should see the
following html page