We explain how to install PHP (PHP Hypertext Processor) for Windows and configure it as an Apache server module. It is assumed that you have already installed the Apache server.
There are two ways to install PHP: as an apache Module , or as a CGI program. The module version is better, faster, and more secure than the CGI version so we will only show how to install it.
You can install PHP from the CD-ROM or online.
To install from the CD locate the file
\software\php-4.3.8\php-4.3.8-Win32.zip.
To install online go to the
PHP web site www.php.net and
find the file php-4.3.8-Win32.zip.
Online there is also another installer version: DON'T GET IT.
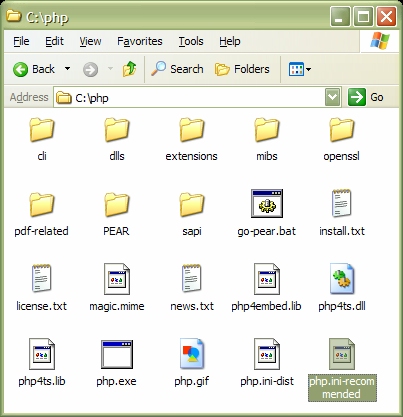
Unzip the file into your top level c:\ directory and
you will have a directory called c:\php-4.3.8-Win32.
Rename this directory to just c:\php. It should look like
The file install.txt gives details on how to configure
PHP to work with various web servers. We won't need it for these notes
since the following sections explain how to do this for the Apache web
server.
There is an important file called php.ini-recommended in your
installation directory c:\php .
Copy this file to directory c:\windows and rename the
copy to php.ini.
This is the main configuration file for PHP.
When we install PHP as an Apache module this file will be read every time
the Apache server is started or restarted.
It is important to note that
each time you make changes to the php.ini file it is necessary
to restart the Apache server before the changes take effect.
We will now make some modifications to this file.
Search php.ini for the line
doc_root =and change it to
doc_root = "c:\Apache\htdocs"This specifies that our PHP root directory will be the same as the Apache root directory.
First locate the file c:\php\php4ts.dll and copy it to
c:\windows\system32.
Now we need to make some modifications to the Apache configuration
file c:\apache\conf\httpd.conf.
Before modifying httpd.conf make a copy of it called
httpd.conf-original in case you make some mistakes.
Search httpd.conf until you find the section with all the
LoadModule statements that are commented out (lines beginning
with # are comment lines)
and add the line
LoadModule php4_module c:/php/sapi/php4apache.dllat the end of this section. This line tells Apache to load the php module and where to find it in your file system.
Now locate the section of the file with all the AddModule
statements. At the end of this section add the three lines
AddModule mod_php4.c
AddType application/x-httpd-php .php
AddType application/x-httpd-php-source .phps
httpd.conf
and php.ini to be read.
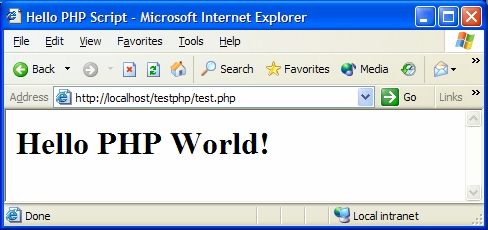
The command window should now show
Apache/1.3.29 (Win32) PHP/4.3.8 running...indicating that PHP has been successfully installed as a module. You can minimize this window.
To test your installation
make a testphp directory under your htdocs directory
for testing php scripts.
In this directory create the following simple script
called hello.php
<html>
<head><title>Hello Script</title></head>
<body>
<?php echo "<h1>Hello PHP World!</h1>";?>
</body>
</html>
Now the full path to
test.php should be
c:\apache\htdocs\testphp\hello.php.
To execute the script enter the following url in a browser
http://localhost/testphp/hello.phpand you should see a screen like
; Print out errors (as a part of the output).  For production web sites,
; you're strongly encouraged to turn this feature off, and use error logging
; instead (see below).  Keeping display_errors enabled on a production web site
; may reveal security information to end users, such as file paths on your Web
; server, your database schema or other information.
display_errors = Off
in the
php.ini file and changing display_errors = Off
to display_errors = On
On a production server this should not be done for security reasons.
gd library provides functions for dynamically creating
jpg and png image files
and the pdf library provides functions for dynamically creating
pdf files.
They are not installed by default.
To install these packages we need to define the extension directory to
be c:\php\extensions because this is where the extension
dll's are located.
In this directory you will find files called php_gd2.dll
and php_pdf.dll.
To install these extensions you need to edit php.ini,
find the lines (lines beginning with a semi-colon are comment lines in PHP)
;extension=php_gd2.dlland
;extension=php_pdf.dlland remove the semi-colons (uncomment the lines). Then search for the lines
; Directory in which the loadable extensions (modules) reside.
extension_dir = "./"
and change the second line to
extension_dir = "c:\php\extensions"
c:\apache\sessions
(PHP will not create it for you).
To tell PHP to put the session files there it is necessary to modify a line
of the php.ini file.
Locate the lines
; Argument passed to save_handler.  In the case of files, this is the path
; where data files are stored. Note: Windows users have to change this
; variable in order to use PHP's session functions.
;session.save_path = /tmp
and uncomment (remove initial semi-colon) the last line and change it to
session.save_path = "c:\Apache\sessions"
; UNIX: "/path1:/path2"
;include_path = ".:/php/includes"
;
; Windows: "\path1;\path2"
;include_path = ".;c:\php\includes"
and uncomment (remove initial semi-colon) the last line (Windows) and change it to
include_path = ".;c:\php;c:\Apache\php-includes"This means that include files will be searched for first in the current directory and then in
c:\php and then in c:\Apache\php-includes.
It is necessary to restart Apache if it is running for these
changes to php.ini to take effect.
This is a searchable version of the 1800 page PHP documentation
It comes in a file called php_manual_chm_12.zip and is
available online at
http://www.php.net/docs-echm.php
or on the CD-ROM
(\software\php-4.3.8\php_manual_chm_12.zip).
The best place to store the documentation is in the c:\php
installation directory. Make a folder there called
c:\php\docs and unzip the file into this directory.
Now you can execute the file c:\php\docs\php_manual_en.chm
to see the documentation. For easier access make a shortcut to this file
on the desktop.
You can also use the nice phpZ skin by running
php_manual_prefs.exe and choosing it from the skins box.
phpinfo() that will
display comprehensive information about the Apache/PHP configuration
and installed extensions. To use it create the following PHP script called
info.php and put it in your testphp directory:
<html>
<head><title>PHP Info</title></head>
<body>
<?php phpinfo(); ?>
</body>
</html>
Try it using the url
http://localhost/testphp/info.php.
You will see a comprehensive list of the Apache and PHP configuration
information. Notice that our installed extensions gd
and pdf are shown as enabled.
<?php
// ------------------------------------------------------------
// This script generates a form and prcessess the form.
// The value of the submit button is used to determine whether
// to display the form or process the form.
// If the submit button is undefined then the form is displayed
// else the form is processed
// ------------------------------------------------------------

if (isset($_REQUEST['button'])) // submit was clicked
{
   display_output_page();
}
else // display form for first time
{
   display_form_page();
}
?>

<?php
function display_form_page()
{
   $self = $_SERVER['PHP_SELF'];
?>
<html>
<head><title>PHP form example</title></head>
<body>
<h1>PHP form example</h1>
<form action="<?php echo $self ?>" method="POST">
First  name: <input type="text" name="firstname"><br>
Last name: <input type="text" name="lastname">
<p>
<input type="submit" name="button" value="Submit Name">
</form>
</body>
</html>
<?php
}
?>

<?php
function display_output_page()
{
   $self = $_SERVER['PHP_SELF'];
   $first_name = $_REQUEST['firstname'];
   $last_name = $_REQUEST['lastname'];
?>
   <html>
   <head><title>Form Results</title></head>
   <body>
   <h1>Form Results</h1>
   <?php echo "Hello $first_name $last_name<br/>\n"; ?>
   <p>
   <a href="<?php echo $self?>">Try another name</a>
   </body>
   </html>
<?php
}
?>
Put this script in your testphp directory and use the url
http://localhost/testphp/process_form.php to execute it.