In these notes we show you how to install the Tomcat server on Windows XP
and configure it for testing servlets and JSP's.
Since Tomcat is written in Java you will need to have Java installed before
beginning the tomcat installation process.
For example, you should have the Java SDK version 1.4.2
installed in a directory such as c:\j2sdk1.4.2.
You can find the Tomcat installation file on the CD as
\software\tomcat-5.0.25\jakarta-tomcat-5.0.25.exe,
or you can obtain it online from the Jakarta Project home page at
http://jakarta.apache.org/tomcat/,
locating the binary section of downloads, and finding
the file jakarta-tomcat-5.0.25.exe in the bin directory
to download (do not download the zip version).
If you have a previous version of Tomcat installed you should uninstall it.
When you have the exe file double click on it
to begin the automated installation process.
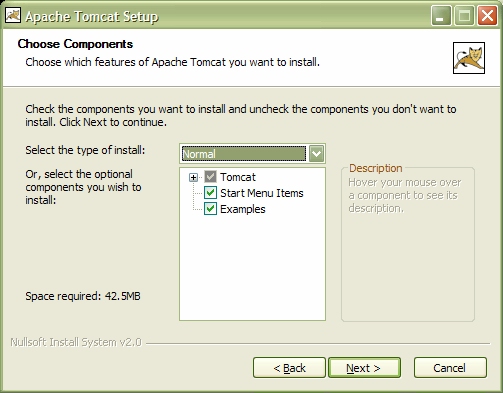
After accepting the license agreement you will see the screen
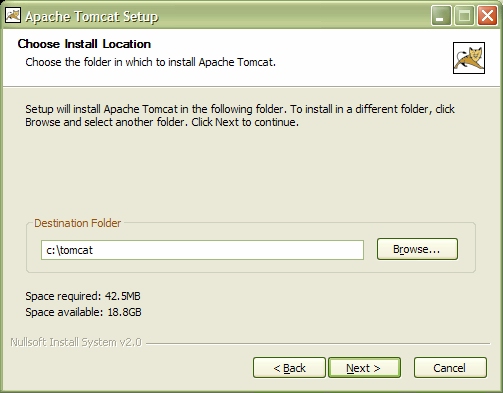
The next screen asks for the Tomcat installation directory.
Change the "Destination Folder" value
to the shorter one
c:\tomcat (directories and files containing spaces
can cause problems) which will be assumed in these installation
instuctions:
The next screen asks for an administrator password for user admin.
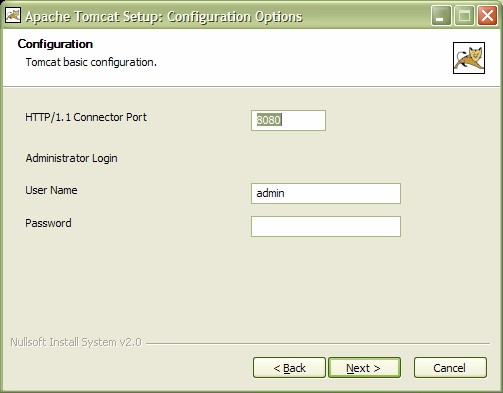
Choose a password (you can just use admin for your local PC)
and leave the http port at 8080 (Note: If Tomcat is the only web
server you will be running concurrently then you can change this to the
default value 80 so that the port doesn't need to be specified in URL's.
For our course leave it at 8080 because we are using the Apache Web Server
at port 80).
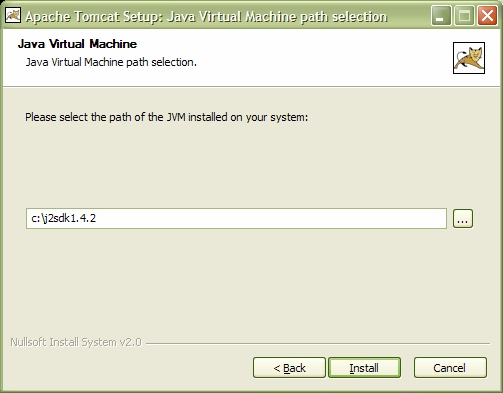
The next screen asks for the path to the JVM (Java Virtual Machine) and shows a default path.
WARNING: This screen has an error in it: the screen refers to the "Java Virtual Machine" and it should refer to the "Java Software Development Kit". You must change the path on this screen to the directory in which you installed the Java SDK (software development kit).
This should be
c:\j2sdk1.4.2 if you followed the Java install instructions.
This directory will be assumed in these notes as shown:
When the installation process is completed you will see the final screen
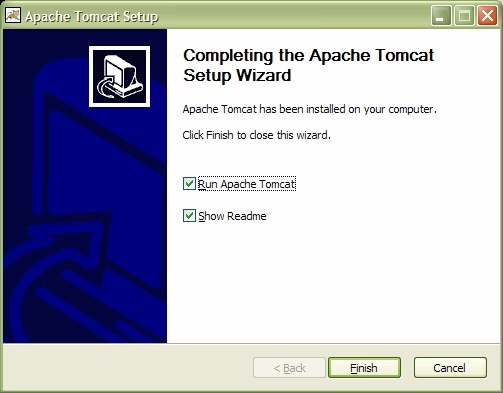
The "Run Apache Tomcat" checkbox is misleading: it doesn't actually run Tomcat. Instead it runs the Tomcat monitor which allows us to start and stop the Tomcat server. Leave it checked. Uncheck the "Show Readme" box and click finish.
Tomcat 5 is now installed and we need to learn how to start, stop and configure it.
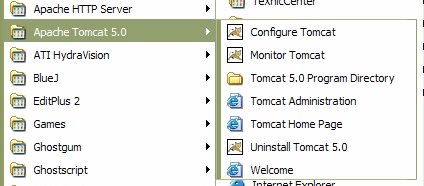
The installation process places various items on the start menu:
If you select menu item "Tomcat 5.0 Program Directory" you should see the installation directory
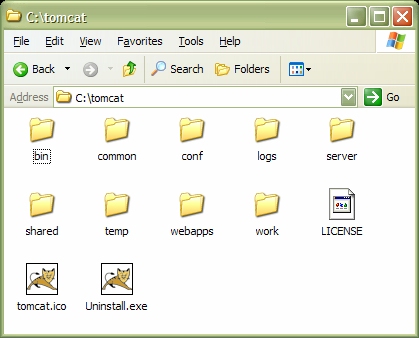
Later we will explain some of the subdirectories shown here.
conf subdirectory you will find two important files called
server.xml and web.xml. Make backup copies in
this directory called server-orig.xml and
web-orig.xml.

It's the first one on the left [If you don't have this icon then choose the "Montor Tomcat" entry from the start menu].
Double-click this icon to see the following preferences window:

On the "General" tab you will notice that the server status is "Stoppped" indicating that Tomcat is not yet running. Click the "Start" button to start the server (to stop a running server you would click the "Stop" button):
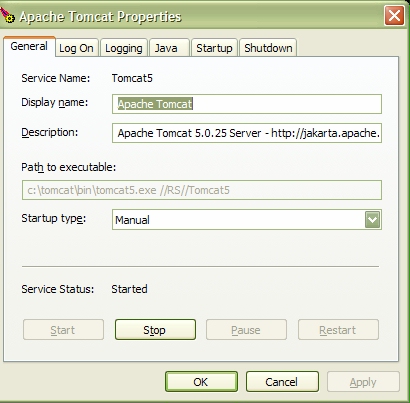
You can now close this window (click OK). The status of the server can always be determined by clicking the Apache-Tomcat icon in the system tray. If the icon is not there then as mentioned above choose "Monitor Tomcat" from the start menu.
http://localhost:8080/The
http:// part must be specified.
The standard port for a general web server such as apache is 80
and doesn't need to be specified.
For Tomcat the default port is 8080 and must be specified.
We will use the default port.
You should see the following home page:
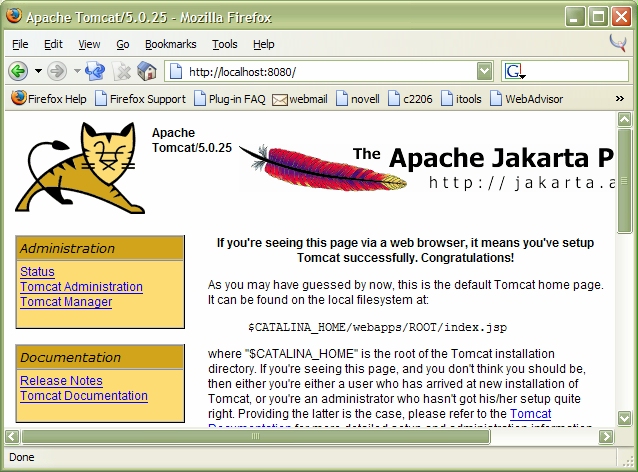
This home page contains complete documentation of the Tomcat server. If you don't see it maybe your server is stopped and you need to start it.
javax.servlet
javax.servlet.http
They are available from Sun separately but they are also part of the Tomcat distribution in a jar file called
servlet-api.jar.
The full path to this file is
c:\tomcat\common\lib\servlet-api.jarThus, if you have a servlet called
HelloWorld.java you can
compile it in a command prompt window (NOTE: we are assuming that the
Java compiler is in your path) with a command such as
javac -classpath .;c:\tomcat\common\lib\servlet-api.jar HelloWorld.javaRecall that "dot" refers to the current directory. If other packages are used their classpath must also be included. Thus, the classpath can be rather long so we explain below how to create a custom command prompt that sets the classpath for us.
To test your compiler setup create the following file, save it as
HelloWorld.java, and compile it.
For now you can put this file in any directory.
Later we will learn how to install it as a servlet in a web application.
import java.io.*;
import javax.servlet.*;
import javax.servlet.http.*;

public class HelloWorld extends HttpServlet {

   public void doGet(HttpServletRequest request,
      HttpServletResponse response)
      throws IOException, ServletException
   {
      response.setContentType("text/html");

      PrintWriter out = response.getWriter();

      out.println(

          "<html>\n" +
             "<head>\n" +
	          "<title>Hello World</title>\n" +
             "</head>\n" +
          "<body>\n" +
          "<h1>Hello World</h1>\n" +
          "This html document was produced by a servlet.\n" +
          "</body>\n" +
          "</html>\n"
      );
      out.close();
   }
}
If you don't want to type it in download it:
HelloWorld.java.
It is available on the CD in directory \install-notes\tomcat5.
If all goes well you will have the class file HelloWorld.class.
http://localhost:8080/tomcat-docs/index.htmlThe documentation for the servlet packages is part of the Tomcat distribution: choose "Tomcat documentation" from the Tomcat home page and then choose the "Servlet API Javadocs" link near the bottom of the left menu.
Alternatively you can find the Tomcat documentation at
c:\tomcat\webapps\tomcat-docs\index.html
and "Servlet/JSP Javadocs" at
c:\tomcat\webapps\tomcat-docs\servletapi\index.html
You can make shortcuts to these links on the desktop.
A web application is a collection of Java servlet class files and other Java classes, html pages, Java Server Pages, and related resources such as image files that make up an application such as an online store that can be deployed by the web server.
Each web application is rooted in a context path which, by default,
is a subdirectory of the Tomcat web application directory webapps:
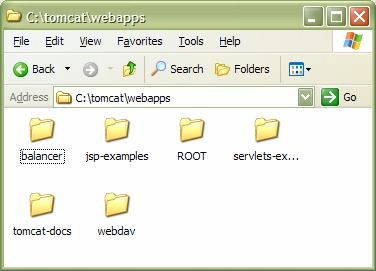
Here the directory c:\tomcat\webapps is the default directory
for installing web applications.
Here we see six web application directories. Each is called a context path.
These applications come with the Tomcat distribution and we will show how
to add our own.
servlet-examples context path contains some
sample Java servlets that can be accessed from the Tomcat home page
(http://localhost:8080/) or using the URL
http://localhost:8080/servlet-examples/.
jsp-examples context path contains some
sample Java Server Pages that can be accessed from the Tomcat home page
(http://localhost:8080/) or using the URL
http://localhost:8080/jsp-examples/.
ROOT is the default context path.
It contains the home page that appears
when you use the URL
http://localhost:8080/
tomcat-docs context path contains the complete documentation
for the Tomcat server, Java servlets, and Java Server Pages.
It can be started using the URL
http://localhost:8080/tomcat-docs/
webdav context path defines an application that can be used
for remote web site authoring. We will not use it. Also I have no idea
what the balancer application does so don't touch it.test. This requires the following steps
test.webapps directory.test web application
can be seen in the following directory tree:
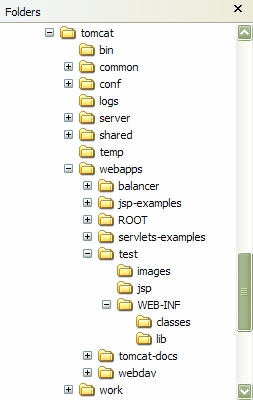
test directory itself or
in any subdirectory.images directory can be used to hold any images
required by the application.test directory
itself or in any subdirectory. It is common to put them in a jsp
directory as shown in the directory tree.WEB-INF directory holds the Java classes, jar files
and configuration files used by the web application.classes directory, inside the WEB-INF
directory, holds the Java class files.
The web server looks for any class files and packages in this
directory so the package structure, if any, is created below
the classes directory.
Packageless classes go directly in the classes directory.
We will also put our Java source files here
although in real applications it is best to keep them separate and
outside the application directories.
lib directory is optional and is needed only to
contain jar files used by your application,
such as a JDBC database driver.jsp directory inside WEB-INF is
used for Java server page tag libraries.web.xml must be placed in the
WEB-INF directory.
It can be used to specify mappings of Java servlet class names
to the names that appear in URL's, as well as application and servlet
initialization parameters.WEB-INF directory
name must be in uppercase or nothing will work.
Make this directory structure and for the web.xml file
just copy the one in the tomcat-docs application,
c:\tomcat\webbapps\tomcat-docs\WEB-INF\web.xml,
and edit it so that it looks like
<?xml version="1.0" encoding="ISO-8859-1"?>

<!DOCTYPE web-app
    PUBLIC "-//Sun Microsystems, Inc.//DTD Web Application 2.3//EN"
    "http://java.sun.com/dtd/web-app_2_3.dtd">

<web-app>
  <display-name>Test Application</display-name>
  <description>
     An application for testing servlets and JSP
  </description>
</web-app>
Now save it as c:\tomcat\webapps\test\WEB-INF\web.xml.
Later we will see how to use this file to define servlet mappings.
The directory structure for test application should now
look like
   test (dir)
     |
     +--- images (dir)
     |
     +--- jsp (dir)
     |
     +--- WEB-INF (dir)
             |
             +--- classes (dir)
             |
             +--- lib (dir)
             |
             +--- web.xml
A simple approach to compiling servlets in our web application called
test is to create a batch file called
c:\batfiles\testservlets.bat containing the statements
@echo off
echo Setting path for Java 1.4.2
echo Setting classpath for test servlets and JSP
SET PATH=c:\j2sdk1.4.2\bin;%PATH%
SET CLASSPATH=.;c:\tomcat\webapps\test\WEB-INF\classes;
SET CLASSPATH=%CLASSPATH%;c:\tomcat\common\lib\servlet-api.jar
and place in a directory called
c:\batfiles.
The classpath includes the top level classes directory
of the test application as well as the jar file
for the servlet classes. This means that java packages will be
looked for in the current directory (default package),
the classpath directory for the test application
and the jar file containing the servlet classes.
Note how %CLASSPATH% is used
to refer to the current CLASSPATH
value so the final SET statement concatenates the jar file path
on the end of the current path.
Then you can make a custom command
prompt shortcut called testservlets on the desktop
or in the c:\batfiles directory
(find your command prompt on the start menu and drag a shortcut to the desktop)
whose program properties look like
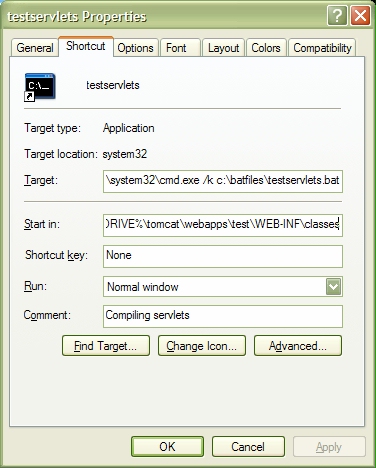
Here the "Target" directory is
%SystemRoot%\system32\cmd.exe /k c:\batfiles\testservlets.batand the "Start-in" directory is
%HOMEDRIVE%\tomcat\webapps\test\WEB-INF\classes
You can customize the working and batch file directories yourself and add other classpaths if needed.
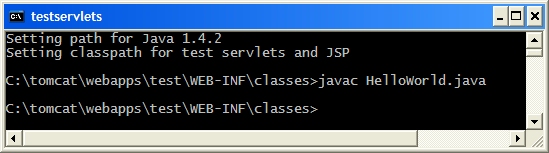
Now you can compile Java classes for servlets:
When you double-click this prompt the testservlets.bat
file will execute and set the path and the classpath.
To test your custom prompt copy the HelloWorld.java file
created earlier to
the classes directory of the test application:
c:\tomcat\webapps\test\WEB-INF\classes\HelloWorld.javaand compile it:
If you want to use a separate development directory then, after compiling,
you will have to copy your class files to the test application
deployment classes directory.
HelloWorld. Instead the Tomcat server does it.
There are two ways to run a servlet in our test application:
test context's
web.xml file.web.xml
configuration file in c:\tomcat\conf.
This is an important configuration file so always make a backup copy before
editing it. Edit this file and find the lines
<!--
    <servlet>
        <servlet-name>invoker</servlet-name>
        <servlet-class>
          org.apache.catalina.servlets.InvokerServlet
        </servlet-class>
        <init-param>
            <param-name>debug</param-name>
            <param-value>0</param-value>
        </init-param>
        <load-on-startup>2</load-on-startup>
    </servlet>
-->
Remove the comment tags (comments begin with <!-- and
end with -->)
so that it looks like
    <servlet>
        <servlet-name>invoker</servlet-name>
        <servlet-class>
          org.apache.catalina.servlets.InvokerServlet
        </servlet-class>
        <init-param>
            <param-name>debug</param-name>
            <param-value>0</param-value>
        </init-param>
        <load-on-startup>2</load-on-startup>
    </servlet>
Now find the lines
    <!-- The mapping for the invoker servlet -->
<!--
    <servlet-mapping>
        <servlet-name>invoker</servlet-name>
        <url-pattern>/servlet/*</url-pattern>
    </servlet-mapping>
-->
and remove the comment tags for the servlet-mapping
to get
    <!-- The mapping for the invoker servlet -->
    <servlet-mapping>
        <servlet-name>invoker</servlet-name>
        <url-pattern>/servlet/*</url-pattern>
    </servlet-mapping>
Restart the server (stop it if it is running then start it )then run the
HelloWorld servlet, that you compiled in the test
application classes directory,
using the following URL in a browser
http://localhost:8080/test/servlet/HelloWorldto obtain
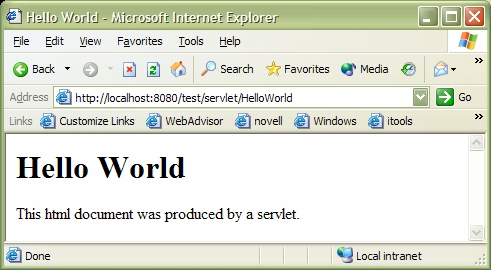
The URL contains the name of the context path test and the
full name of the Java class file. The word servlet
indicates that we are using the default method for
referring to a servlet.
The word servlet here does not refer to any directory. It
simply indicates that the full class name of the servlet follows.
Later we will discuss a better way to refer to servlets
by placing mapping entries into
the web.xml file in the WEB-INF subdirectory.
classes
directory called mypackage.
Make a copy of HelloWorld.java in this directory.
Add the line
package mypackage;to the top of this file and change the text printed to
This html document was produced by a servlet in a package.Now, using your custom prompt that has the classpath set go to the
mypackage directory and compile it using
javac HelloWorld.javaNow restart the server again and use the URL
http://localhost:8080/test/servlet/mypackage.HelloWorldto run the servlet using the full package name in the URL:
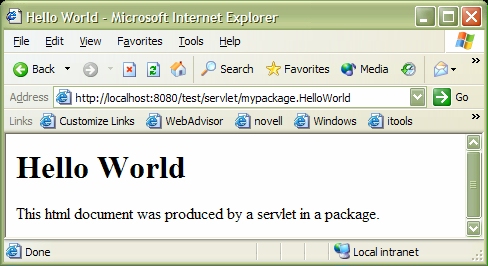
This is recommended on a production server but not on a development server
such as ours, where we may compile classes many times during development.
We don't want to continually stop and restart the server.
This can be avoided by providing a "context configuration file" that overrides
the default configuration of a web application. This context file has the same
name as the context so in our test application it is called test.xml
and contains the following lines.
<?xml version='1.0' encoding='utf-8'?>
<!-- Make the test application reloadable -->
<Context path="/test" reloadable="true">
</Context>
(NOTE: xml files are case-sensitive so be careful).
This file must be placed in directory
C:\tomcat\conf\Catalina\localhostso its full path name is
c:\tomcat\conf\Catalina\localhost\test.xml
NOTE :When you have made this modification stop the Tomcat server and start it again so that the new configuration will be read. Now as you make changes to the test application you will not need to stop and start the server all the time.
web.xml file in the WEB-INF subdirectory
of a web application can be used to define mappings of servlet class
names to logical names which can be used in the URL. Then the default
invoker servlet is not used.
In fact it is recommended that the servlet invoker not be used on a production server since it is unsupported. Therefore after developing a servlet on our PC we will always provide servlet mappings and use them always.
For the test application edit the file
c:\tomcat\webapps\test\WEB-INF\web.xml
so that it looks like
<?xml version="1.0" encoding="ISO-8859-1"?>

<!DOCTYPE web-app
    PUBLIC "-//Sun Microsystems, Inc.//DTD Web Application 2.3//EN"
    "http://java.sun.com/dtd/web-app_2_3.dtd">

<web-app>

  <display-name>Test Application</display-name>
  <description>
     An application for testing servlets and JSP
  </description>

<servlet>
   <servlet-name>Example1</servlet-name>
   <servlet-class>HelloWorld</servlet-class>
</servlet>

<servlet>
   <servlet-name>Example2</servlet-name>
   <servlet-class>mypackage.HelloWorld</servlet-class>
</servlet>

<servlet-mapping>
   <servlet-name>Example1</servlet-name>
   <url-pattern>/helloa</url-pattern>
</servlet-mapping>

<servlet-mapping>
   <servlet-name>Example2</servlet-name>
   <url-pattern>/hellob</url-pattern>
</servlet-mapping>

</web-app>
If you don't want to type it in download it:
web.xml.
It is also available on the CD in directory
\install-notes\tomcat\web.xml
It is very important to keep the tags in web.xml in the correct
order. For example, the <servlet> tags must all be together,
the <servlet-mapping> must all be together and they must follow
the <servlet> tags.
The <servlet> tags define the logical names Example1
and Example2 for our two HelloWorld servlets.
They map the class names into servlet names.
Then the <servlet-mapping> tags associate these servlet names
with the URL patterns helloa and hellob.
Before these mappings become active we need to get the Tomcat server to re-read
the web.xml file.
Do this now by stopping the server and then starting it again (the
Tomcat manager web application can do this without stopping the server).
Now we can refer to the original HelloWorld servlet using the much
simpler URL
http://localhost:8080/test/helloaand we can refer to the package version using
http://localhost:8080/test/hellobNote that the word
servlet is no longer used since we are not
using the default servlet invoker.
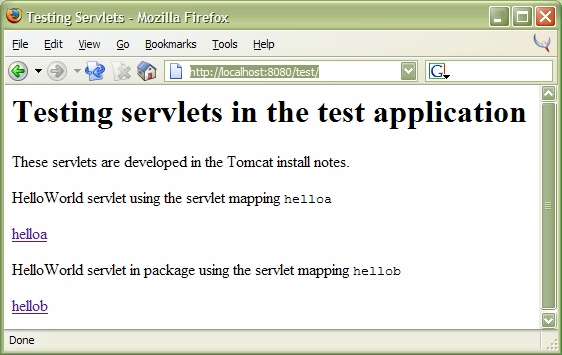
Here is a small HTML file index.html that shows
how to refer to servlets in links in html pages using the servlet
mappings that we have defined.
Put it in your test directory:
<html>
<head><title>Testing Servlets</title></head>
<body>
<h1>Testing servlets in the test application</h1>
These servlets are developed in the Tomcat install notes.
<p>HelloWorld servlet using the servlet mapping
<code>helloa</code>
<p><a href="helloa">helloa</a>
<p>HelloWorld servlet in package using the servlet mapping
<code>hellob</code>
<p><a href="hellob">hellob</a>
</body>
</html>
Now use the URL
http://localhost:8080/test/in your browser to display this home page for the
test
application.
test web application in the
jsp directory c:\tomcat\webapps\test\jsp
As a simple example create the following simple JSP file
hello.jsp:
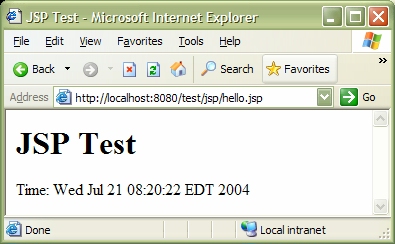
<html>
<head><title>JSP Test</title></head>
<body>
<h1>JSP Test</h1>
Time: <%= new java.util.Date() %>
</body>
</html>
To run this file use the URL
http://localhost:8080/test/jsp/hello.jspand you will see
JDBC and MySQL can be used in standalone Java command-line applications and
also in web applications.
To use the MySQL driver in our test application for Servlets
and JSP it is only necessary to put the driver file in directory
C:\tomcat\webapps\test\WEB-INF\lib
(See Installing JDBC drivers for MySQL).
If you want the driver to be available to all web applications put it in
c:\tomcat\common\lib.
test directory
into your webapps directory.
However, you will learn more if you create it step by step yourself by following these notes and the JDBC notes.
When you have finished creating your test application you
can replace it by the one in test.zip which has an expanded
index.html file and also includes the servlets from the JDBC
install notes (they won't work until you have read the JDBC install
notes and installed the JDBC driver).
To try it use the link
http://localhost:8080/testTo run the two database servlets it is necessary to set up a MySQL database. This is described in the JDBC installation notes (See Installing JDBC drivers for MySql).
test
application and rename it. You can now remove or modify the existing files
and create your own.
Also you will need to create a new context configuration file as was done
above for the test application.
Use your last name as the name of this context.
For example, if your last name is jones then
create the file jones.xml containing the lines.
<?xml version='1.0' encoding='utf-8'?>
<!-- Make the jones application reloadable -->
<Context path="/jones" reloadable="true">
</Context>
and place it in directory
C:\tomcat\conf\Catalina\localhostso its full path name is
c:\tomcat\conf\Catalina\localhost\jones.xml
test
application.