
NOTE: These tutorial were done using Eclipse version 3.1
NOTE: In these tutorials we install Eclipse, workspaces and other
files related to the tutorials in a directory called
c:\eclipse31. If you are using another directory such
as your home directory
c:\Documents and Settings\username\eclipse31
you will need to replace c:\eclipse31
everywhere with your directory.
We assume that you have installed Java 1.5 and Eclipse and have defined an Eclipse workspace. If not go to the main index.
Objective
The Point Class
The Circle Class
The CircleTester Class
The Java Perspective
Creating the Projects
Creating the Packages
Adding Classes to the geometry Package
Adding the Point Class
Adding the Circle Class
Testing Point and Circle with the Scrapbook
Creating the CircleTester class
Why Didn't it Work?
Compiling Classes
Running the CircleTester Application
Changing the Default JRE that Eclipse Uses
Closing a Project
The Eclipse Help System
Next Tutorial: Javadoc Configuration Tutorial
In Eclipse program development is first organized at the top level into one or more workspaces. Each workspace contains one or more projects. A project is normally used to contain a Java application, applet, or library of classes.
Each project contains one or more Java packages and finally each Java package contains one or more classes or interfaces.
In this tutorial we show how to create two Java projects in our default
workspace and how to use packages to
write three classes (1) A Point class that represents
points in the plane, (2) A Circle class that represents
circles, and (3) a CircleTester class to test these
classes.
The first project, called geoproject,
contains a package called geometry
that contains the Point and Circle classes.
The second project, called geotesterproject,
contains a package called geotester that contains
the CircleTester class.
We could have used just one project containing two packages but we want to illustrate here how classes in different projects can reference each other.
Here are the three classes:
package geometry;
/**
 * A class representing immutable geometrical points (x,y)
 * in the plane.
 */
public class Point
{
   private double x;
   private double y;

   /**
    * Construct a point from its coordinates.
    * @param x the x coordinate of the point
    * @param y the y coordinate of the point
    */
   public Point(double x, double y)
   {
     this.x = x;
     this.y = y;
   }

   /**
    * Construct the default point (0,0).
    */
   public Point()
   {
      x = 0.0;
      y = 0.0;
   }

   /**
    * Return the x coordinate of this point.
    * @return the x coordinate of this point
    */
   public double getX()
   {
      return x;
   }

   /**
    * Return the y coordinate of this point.
    * @return the y coordinate of this point
    */
   public double getY()
   {
      return y;
   }

   /**
    * @return a string representation of a Point
    */
   public String toString()
   {
      return "Point[" + x + ", " + y + "]";
   }
}
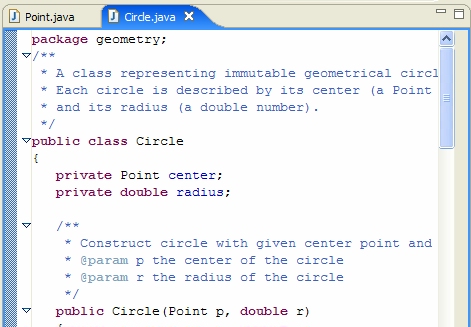
package geometry;
/**
 * A class representing immutable geometrical circles.
 * Each circle is described by its center (a Point object)
 * and its radius (a double number).
 */
public class Circle
{
   private Point center;
   private double radius;

   /**
    * Construct circle with given center point and radius.
    * @param p the center of the circle
    * @param r the radius of the circle
    */
   public Circle(Point p, double r)
   {
      center = p;
      radius = r;
   }

   /**
    * Construct circle with given center coordinates and radius.
    * @param x the x coordinate of the circle center
    * @param y the y coordinate of the circle center
    * @param r the radius of the circle
    */
   public Circle(double x, double y, double r)
   {
      center = new Point(x,y);
      radius = r;
   }

   /**
    * Construct a default circle: a unit circle with center (0,0)
    * and radius 1.
    */
   public Circle()
   {
      center = new Point();
      radius = 1;
   }

   /**
    * Return radius of circle.
    * @return radius of circle
    */
   public double getRadius()
   {
      return radius;
   }

   /**
    * Return center of circle.
    * @return center of circle
    */
   public Point getCenter()
   {
      return center;
   }

   /**
    * @return a string representation of a Circle
    */
   public String toString()
   {
      return "Circle[" + center + ", " + radius + "]";
   }
}
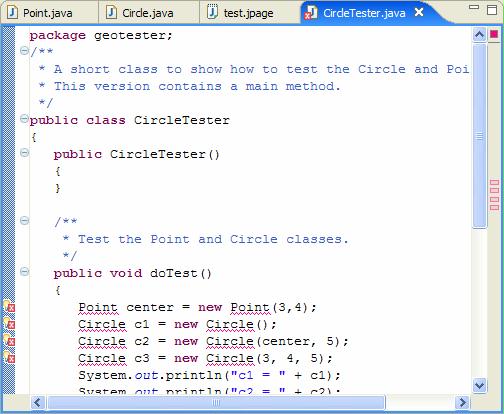
package geotester;
/**
 * A short class to show how to test the Circle and Point classes.
 * This version contains a main method.
 */
public class CircleTester
{
   public CircleTester()
   {
   }

   /**
    * Test the Point and Circle classes.
    */
   public void doTest()
   {
      Point center = new Point(3,4);
      Circle c1 = new Circle();
      Circle c2 = new Circle(center, 5);
      Circle c3 = new Circle(3, 4, 5);
      System.out.println("c1 = " + c1);
      System.out.println("c2 = " + c2);
      System.out.println("c3 = " + c3);

      double radius = c2.getRadius();
      double x = c2.getCenter().getX();
      double y = c2.getCenter().getY();
      System.out.println("Radius = " + radius);
      System.out.println("Center x = " + x);
      System.out.println("Center y = " + y);
   }

   public static void main(String[] args)
   {
      CircleTester tester = new CircleTester();
      tester.doTest();
   }
}
Select this workspace and you will get the welcome window. Close this window by clicking on its close button (X):
By default Eclipse runs with the Java Perspective. This is exacly the perspective we need to write Java projects. You can verify this in the top right corner of the IDE:

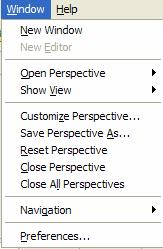
There are other perspectives that we don't need right now. If you are curious click on "Window" in the menu bar:
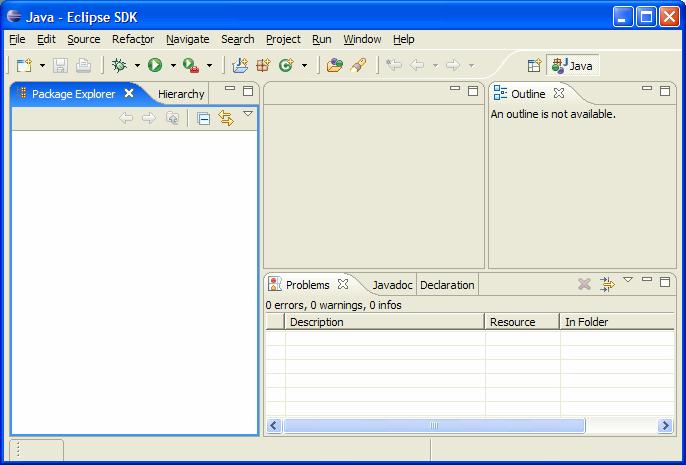
The main Eclipse window is divided into several windows. On the left is the "Package Explorer" which is empty until we create our first Java project.
A Java project contains classes and other resources needed to
define a Java class library, application, or applet.
To create a project called geoproject select "New"
from the "File" menu and select "Project...":

This gives the following dialog box:
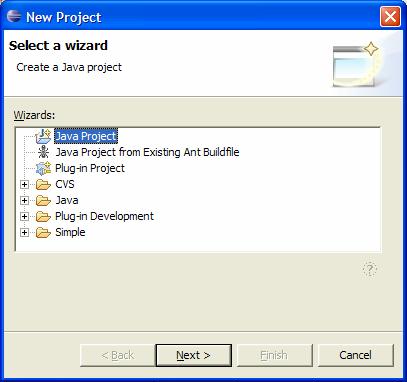
Select "Java Project" if it is not already selected and click "Next >" to obtain the "Create a Java project" dialog box
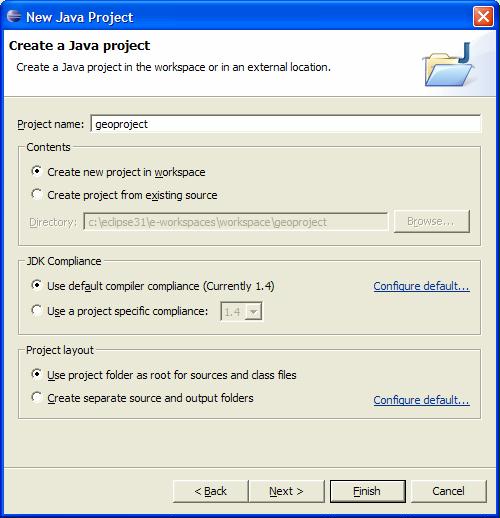
where we have entered the name geoproject in the "Project name:"
field. Also verify that the three radio buttons are as shown.
We now need to tell Eclipse that we want to use Java 5 for all projects.
Notice that the JDK compliance is set currently to 1.4.
To change this click on the link "Configure default..." in
the JDK compliance area to obtain
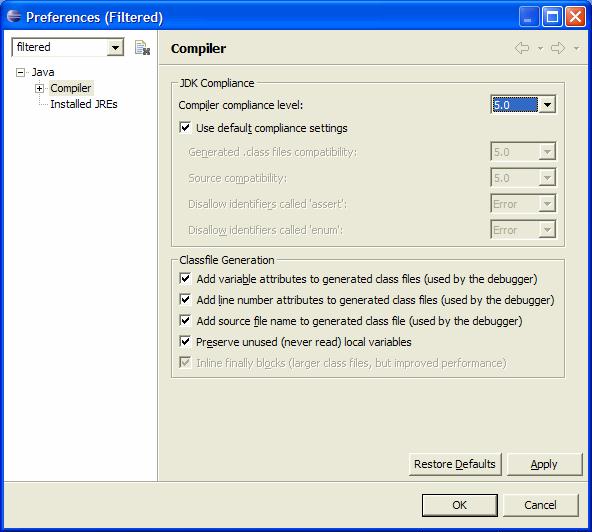
where we have used the drop down box for "Compiler compliance level:" to choose 5.0 instead of 1.4.
Click "OK" to get the dialog box

Select "Yes" to return to the "Create a Java project" dialog box
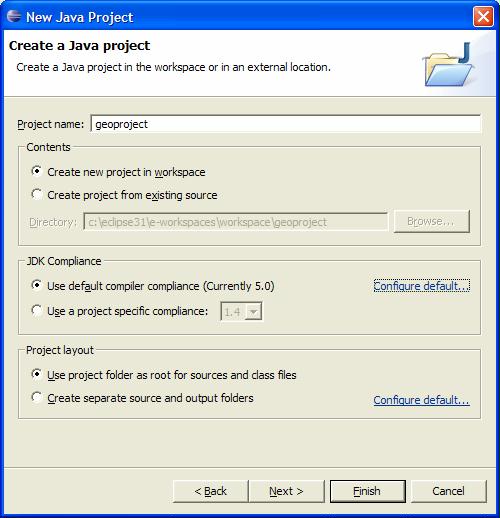
Verify that the project name is geoproject and that
the default compiler compliance is 5.0.
Now whenever you create a project the compliance will be 5.0.
Finally click "Finish" and
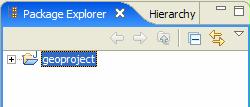
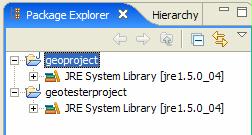
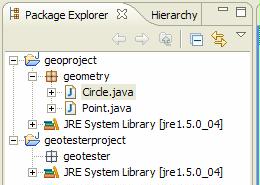
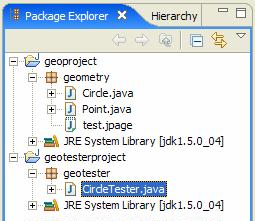
The "Package Explorer" window now shows that we have created a
project called geoproject:
Click the plus sign to open the package explorer tree:
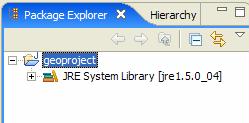
This shows that the Java Runtime Environment (JRE) version 1.5.0_04 is associated with this project.
To create project geotesterproject there is no need to
change the compiler compliance so from the "File" menu select "New",
select "Project...", select "Java Project", click "Next>", enter
the name geotesterproject in the "Project name" field
and click "Finish" to get
Hint: There is a toolbar button to directly create a project.
Note: Each project represents a classpath so there are two classpaths here. A classpath is a directory in which Java searches for classes.
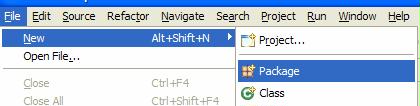
Now we need to create the geometry package in project
geoproject.
To do this first select project geoproject in the
"Package Explorer":
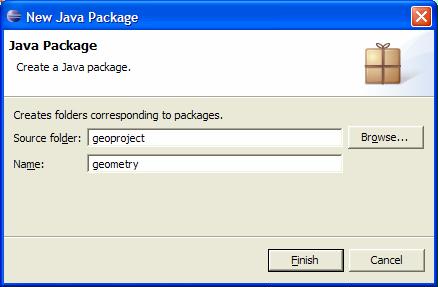
From the "File" menu select "New" and select "Package":
This gives the "Create a new Java package" dialog box
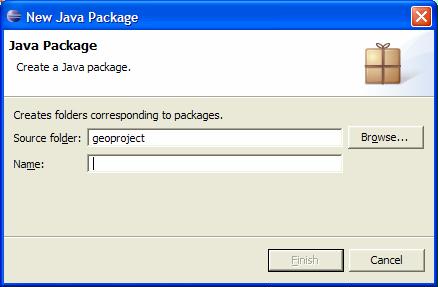
The "Source Folder:" name is shown (it's just the project name)
and we can type the package
name geometry into the "Name:" field:
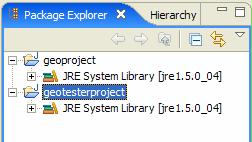
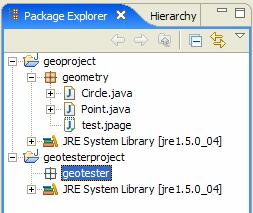
Now click the "Finish" button and the the "Package Explorer" window will look like:
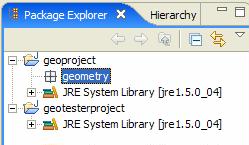
Now repeat these steps to create the geotester
package in the geotesterproject project:
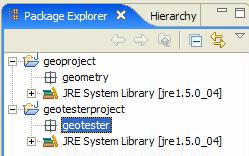
In the "Package Explorer" window select project
geotesterproject.
From the "File" menu select "New",
select "Package", type the name geotester in
the "Name:" field and click the "Finish" button.
Now the "Package Explorer" window looks like.
Notice that the JRE System Library (Java Runtime Environment)
is automatically added to each project.
This simply means that the standard Java packages
and classes such as the
Math class and the String class, are
made available to any classes in the project.
Hint: There is a toolbar button for creating a package.
The project and package structure is now complete so we can
add the Point and Circle
classes to the geometry package.
Select the geometry package in the "Package Explorer".
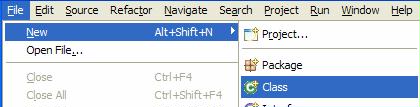
Now select the "File" menu, select "New", select "Class":
This gives the "Create a new Java class" dialog box:
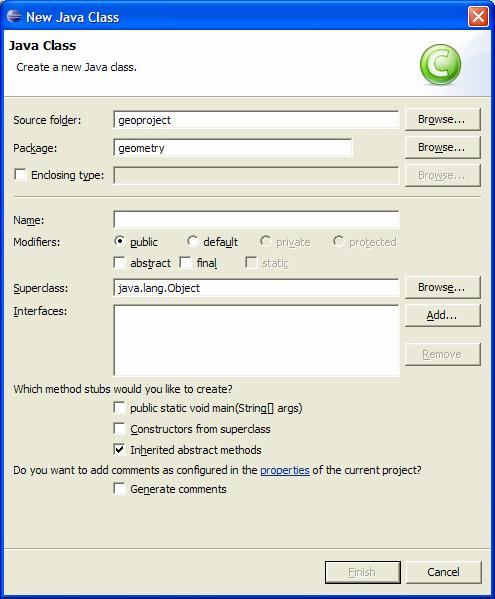
Notice that the "Source Folder:" and "Package:" fields are
automatically set (the source folder name is just the project name)
so just type Point, the name of the class,
in the "Name: " field and click the "Finish" button.
The "Package Explorer" window now looks like
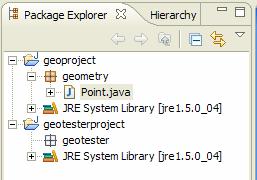
and the Editor window shows the class template:
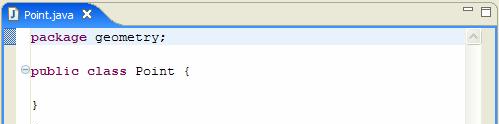
Note that the package statement is automatically placed into
the Point class source file.
Except for comments, it must be the first statement in the file.
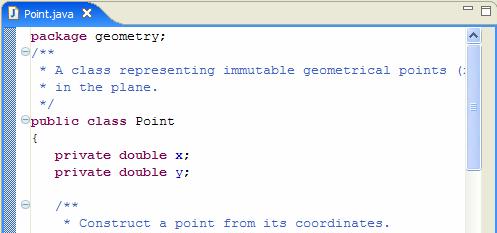
Instead of typing our Point class text you can
just select the Point text at the beginning of this
tutorial, use Control-C to copy the text,
then select all the text in the Editor window
and use Control-V to replace it.
Save the file (choose "Save" from "File" menu, or click the
picture of the floppy disk
( )
near the top left of the tool bar)
and the
class is automatically compiled. The editor window should now
look like
)
near the top left of the tool bar)
and the
class is automatically compiled. The editor window should now
look like
Now repeat the above steps to create the Circle class
in the geometry package
(From "File" menu select "New", select "Class", enter Circle in the
"Name:" field, click "Finish").
After cutting and pasting the Circle
class into the editor window
and saving it the editor window now looks like:
The editor is a multi-tabbed editor. Each tab corresponds to one file.
A file can be closed by clicking the "X" in its tab. Files can be
loaded into the editor by double clicking their name in the
"Package Explorer" window.
The editor window can be maximized or minimized
using the buttons
 in
the top right corner of the editor window.
in
the top right corner of the editor window.
The Point and Circle classes do not have
main methods so they cannot be directly tested without
writing a class with a main method.
Later we will use the CircleTester class to test them.
However, in Eclipse it is possible to test these classes using a scrapbook page, without creating a tester class, as follows:
Select the geometry package in the "Package Explorer".
From the "File" menu select "New",
select "File", type test.jpage into the
"File name:" field and click the "Finish" button. The empty file
test.jpage is now displayed in the Editor window:

and the "Package Explorer" window looks like

You can create as many scrapbook pages as you like but they should
all have the extension jpage.
Type some statements in the scrapbook page so that it looks like:
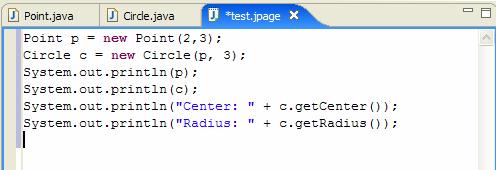
Save the file and select all the text:
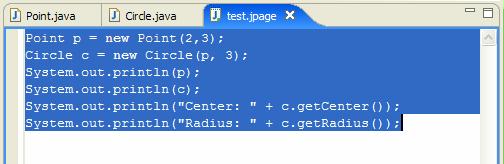
There are two ways to execute the selected code in the scrapbook
page.
You can either click the execute button on the tool bar
(green circle containing a triangle with a J
( ),
or right click the scrapbook page and select execute.
Try it and you should see some errors:
),
or right click the scrapbook page and select execute.
Try it and you should see some errors:
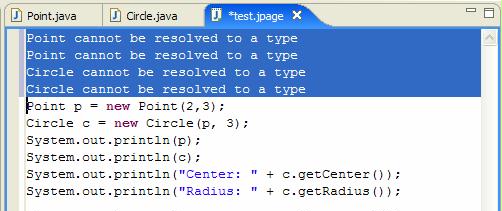
The Point and Circle classes are
not recognized. They are in packages and we need to import
them into the scrapbook.
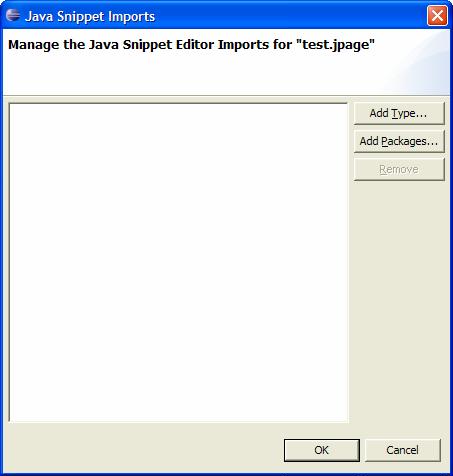
First delete the error text in the scrapbook. To import classes into the scrapbook right click on the scrapbook window and select "Set Imports ..." to obtain the dialog box
Click the "Add Packages" button, and type g in the input box (shows all packages beginning with g) to get:

Click OK to get
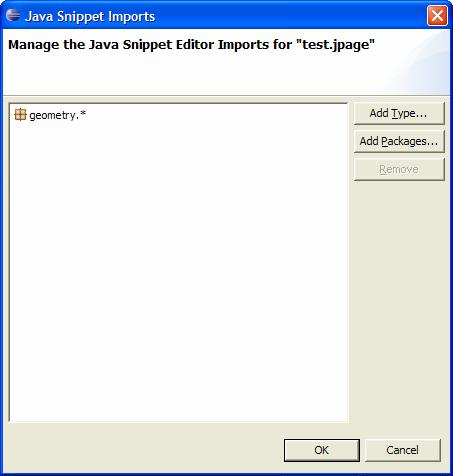
Finally, click the "OK" button and all classes in the geometry package have been added to the scrapbook's classpath.
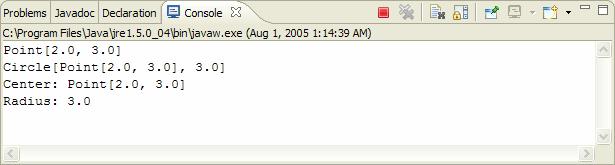
Now return to the scrapbook, select all the text and execute it to obtain the following results in the console window:
Each time you want to execute some code from a scrapbook page
you must select it first. Only the selected text will be executed.
The results are appended to the console window.
However you can clear the text by right clicking on the console
window and selecting "Clear" or by clicking on the eraser
( ) on the console window
toolbar.
You can also stop execution by clicking the red square
(
) on the console window
toolbar.
You can also stop execution by clicking the red square
( ).
).
The statements you type in the scrapbook must make sense.
For example, it is not possible to execute just the last 4 lines
in the example since the object references p and c
are not defined in these lines: each time a block of statements is executed
there is no memory of previously executed statements.
Now let us add the CircleTester class to the
geotester package in project geotesterproject.
This is done in the same way as for the Point
and Circle classes.
Select the geotester package in the "Package Explorer":
From the "File" menu select "New", select "Class"
and in the "Name:" field type
CircleTester. Since this class contains a main
method you can click the box for the main method:
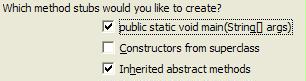
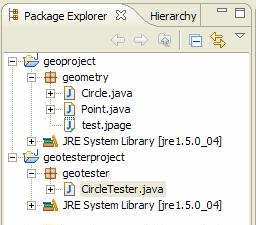
and then click the "Finish" button. The "Package Explorer" window now looks like
and the Editor window shows
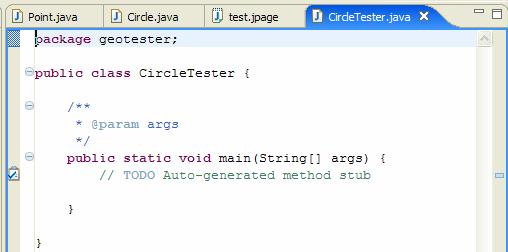
Notice that a stub for the main method is provided.
A Javadoc comment template is also provided.
Note: Instead of cutting and pasting the text for this class
you may want to type the CircleTester class yourself
just to see how the editor works and then save it
(click on the toolbar).
After saving the file you will notice in the editor window contains
There are four error markers in the left margin. Hold the mouse cursor over one of them to see some details:
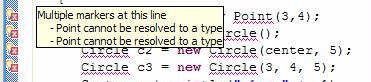
Also click on the "Problems" tab in the window below the editor:
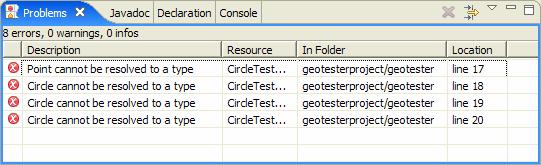
It seems that the Point
and Circle classes are not recognized.
The problem is that the CircleCalculator class
is referencing classes Point and Circle
that are in another package and in another project.
Right now only the geotesterproject is on our
classpath and we need to add the geoproject classpath
to it so that Point and Circle classes
can be found. Each project represents a classpath.
We need to "link" the two projects together
and use import statements.
To do this first select geotesterproject in the
"Package Explorer" window (click on it).
Note that red error icons are also shown in the "Package Explorer".
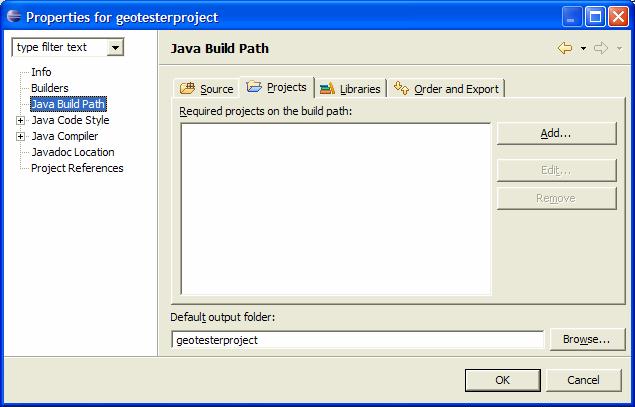
Now select the "Project" menu and select "Properties". This gives the dialog box
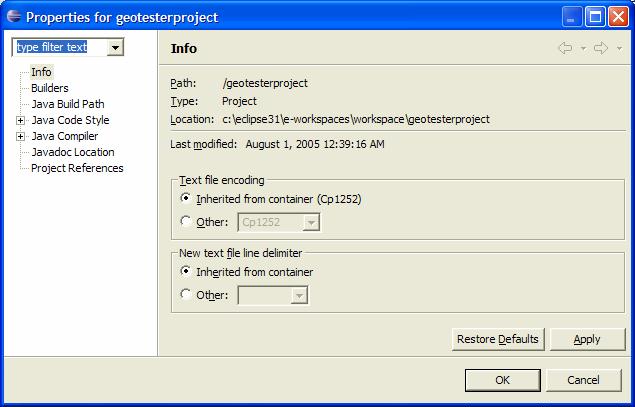
Select "Java Build Path" from the list and select the "Projects" tab:
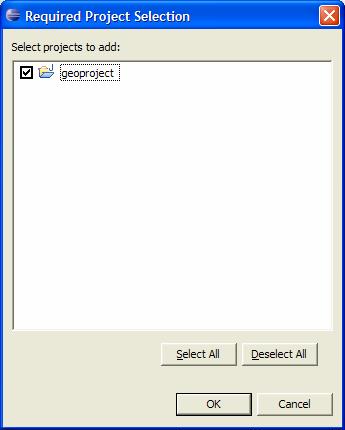
Now click the "Add..." button and put a check mark in the geoproject entry
Click the "OK" button to get
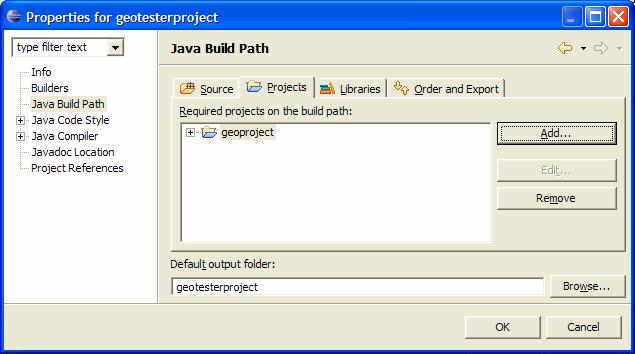
which shows that the build path now contains the project
geoproject
so the classpath now contains both projects.
Click "OK" and
return to the editor window and add the following import
statements after the package statement:
import geometry.Point;
import geometry.Circle;
These statements are needed because the
Point and
Circle classes are in a different package
from CircleTester.
Save the file and all error messages in the CircleTester
class have disappeared:

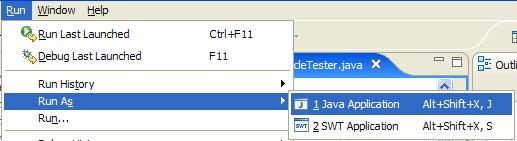
You can now execute CircleTester as a
Java application since it has a main method.
First select CircleTester.java in the "Package Explorer"
window or in the editor window.
Then from the "Run" menu select "Run As", and select "Java Application":
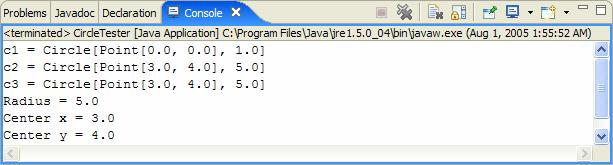
The results in the console window are
WARNING: Make sure you select the CircleTester
class each time you want to run it.
TIP: To run a class like CircleTester again you
can choose "Run Last Launched" from the "Run" menu or simply
press "Ctrl F11".
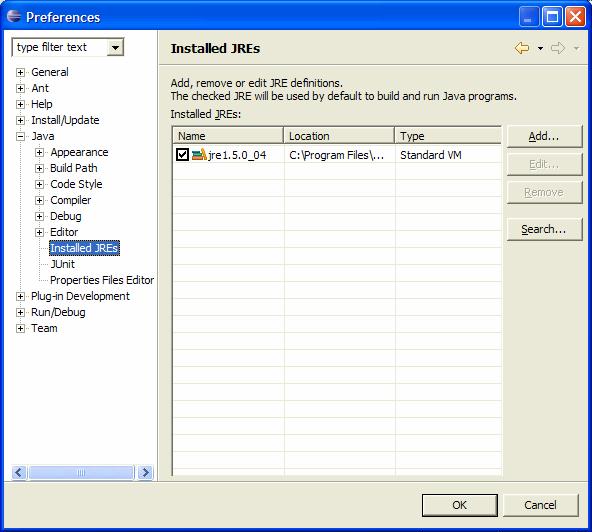
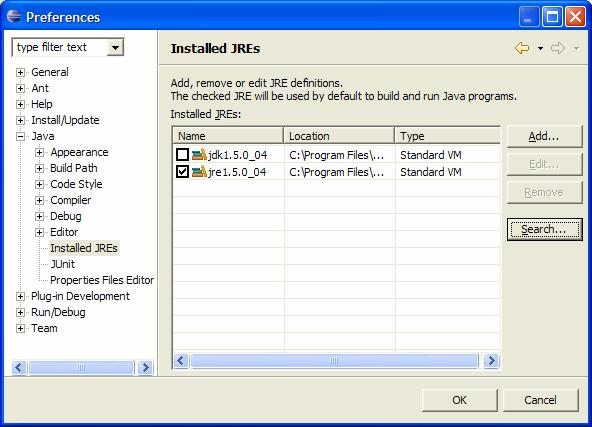
Now is the time to change the Default JRE (Java Runtime Environment) that Eclipse uses. We need to use a JRE that is part of a JDK (Java Software Development Kit). Normally when Eclipse is installed it use a JRE that is not part of a JDK (it uses the same JRE that Eclipe itself uses).
So far we have been using a JRE that is not part of a JDK. To verify this just look at one of the projects we have developed in the "Package Explorer". It will show

jdk1.5.0_04.
The following directory shows where the JRE and JDK are located.
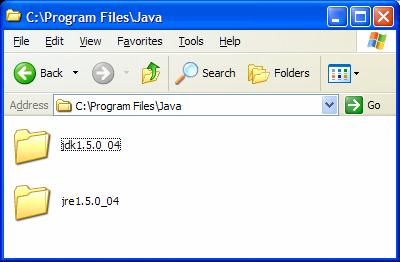
We arecurrently using the JRE in directory jre1.5.0_04
and we need to use the one in jdk1.5.0_04:

It's in directory jre.
Thus the full path to the JRE that we want is
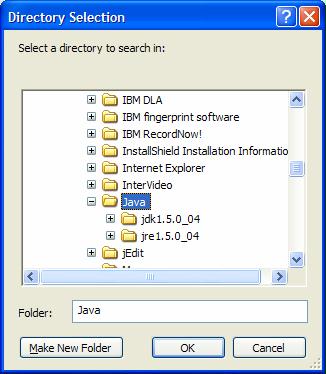
c:\Program Files\Java\jdk1.5.0_04\jreTo change the JRE return to Eclipse and from the Eclipse "Window" menu select "Preferences":

When you are finished with a project,
or you are not currently working on it,
you should close it.
This does
For example, to close geotesterproject select
it in the Package Explorer (click on it), right click it
and choose "Close Project" on the menu.
Do the same for geoproject and the
"Package Explorer" window now looks like
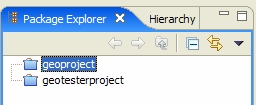
indicating that the projects are not available. This does not delete them. If you need to open them again just select each project, right click it and choose "Open Project" from the menu.